
Key Takeaways
- Monochrome astrophotography captures more detail and is better suited for narrowband imaging, especially in light-polluted areas.
- OSC (One-Shot Color) cameras are more convenient for shorter sessions and provide immediate color images but with less detail.
- Choosing between monochrome and OSC depends on your goals, budget, and the amount of time you can dedicate to your astrophotography.
- Filters play a crucial role in monochrome astrophotography, allowing for targeted light capture and higher contrast images.
- Both monochrome and OSC require different techniques for image processing, with monochrome needing more post-processing work.
Capturing the Cosmos: A Guide to Monochrome vs. OSC Astrophotography
When you gaze up at the night sky, the stars twinkle back in a dance of light that has fascinated humans for millennia. Now, we have the technology to capture that dance in stunning detail. If you’re embarking on the rewarding journey of astrophotography, you’ll soon face a pivotal decision: should you use a monochrome or a One-Shot Color (OSC) camera? This choice will shape your experience, the images you capture, and the stories you tell through your lens.
Discovering the Universe Through Lenses
Think of your camera as a spaceship. It’s your vehicle to explore the vast cosmos from your own backyard. The kind of ‘spaceship’ you choose – monochrome or OSC – will determine the kind of journey you’ll have. Both have their unique strengths, and by understanding them, you’ll be well-equipped to capture the universe in all its glory.
Let’s start with the basics. Monochrome cameras record images in black and white, capturing light intensity without color information. This might seem like a step back in a world full of color, but there’s a good reason for it. When it comes to astrophotography, monochrome sensors are simply more sensitive to light. They don’t waste precious photons, and that means you can capture fainter stars and more subtle details.
On the other side, OSC cameras are all about convenience. They capture color images in one go, without the need for additional filters. This makes them a favorite for those who want to get good results quickly, without the extra steps that monochrome imaging requires.
The Battle of Light: Monochrome and OSC Defined
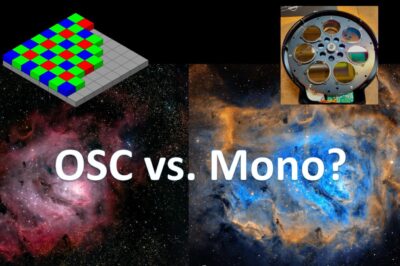
Before diving into techniques, let’s clarify what we’re talking about. Monochrome cameras use a single channel to record light intensity, while OSC cameras have a Bayer filter that splits light into red, green, and blue components. Each pixel of an OSC sensor captures only one color of light, and the camera’s software combines these to create a full-color image.
Now, you might wonder, why would anyone choose a camera that only captures black and white? The answer lies in the detail. Monochrome cameras don’t have a Bayer filter, so every pixel captures light. That means three times more data, three times the sensitivity, and a clearer, more detailed image. And when you’re trying to photograph objects millions of light-years away, every photon counts.
Monochrome Magic: Harnessing Grayscale Granularity
The true potential of monochrome astrophotography lies in its ability to use filters effectively. By using different filters, you can isolate specific wavelengths of light, such as those emitted by hydrogen or oxygen in nebulae. This not only cuts through the light pollution but also reveals the structure and composition of celestial objects in stunning detail.
Choosing the Right Monochrome Sensor
- Consider the sensor size: Larger sensors capture more of the sky but are more expensive.
- Look at quantum efficiency: This tells you how many photons are converted into electrons, which is crucial for capturing faint details.
- Check the pixel size: Larger pixels gather more light, which is especially important for long-exposure deep-sky imaging.
When selecting a monochrome sensor, size matters, but so does efficiency. A sensor with high quantum efficiency will turn more of the incoming light into a digital signal, giving you brighter images with less noise. Also, consider the pixel size. Larger pixels can collect more light, which is a huge advantage when you’re chasing the faint whispers of distant galaxies.
As you delve into the world of monochrome astrophotography, you’ll discover that it’s all about capturing the faintest light. You’ll learn to appreciate the subtle gradients of grayscale and the way they can be transformed into a vibrant palette of celestial colors through careful filtering and processing.
Picking Filters: Broadband vs. Narrowband
Filters are the secret weapons in your astrophotography arsenal. They let you control which light reaches your sensor, and that can make a huge difference in the quality of your images. Broadband filters are great for general use, letting in a wide range of wavelengths, while narrowband filters are like laser-focused ninjas, slicing through the spectrum to isolate the light from specific elements.
Most importantly, the choice between broadband and narrowband filters will depend on your targets. If you’re after galaxies or reflection nebulae, broadband filters will serve you well. But if you want to capture the intricate details of emission nebulae, or if you’re battling against the glow of city lights, narrowband filters will be your best friends.
Mastering Long Exposure Times
Patience is a virtue in astrophotography, especially when using a monochrome camera. Long exposures are essential to collect enough light to create a detailed image. But there’s an art to it. Too short, and you won’t capture the full beauty of your celestial subject. Too long, and you risk overexposure or tracking errors.
It’s a delicate balance, but with practice, you’ll find the sweet spot for each object you photograph. Remember, the longer your exposure, the more critical it is to have precise tracking and a stable setup. Any movement can turn a potential masterpiece into a blurry disappointment.
Now, let’s take a break here. We’ve covered a lot of ground, from the basics of monochrome and OSC cameras to the intricate dance of capturing light. In the next sections, we’ll dive into the colorful world of OSC astrophotography, compare the image quality between the two, and share some practical tips to help you capture the cosmos with confidence.
Understanding OSC Camera Technology
One-Shot Color cameras, affectionately known as OSC, are the go-to choice for many astrophotographers who value time and simplicity. These cameras have a built-in Bayer filter that allows them to capture color images in a single exposure. This technology works similarly to the way our eyes perceive color, with pixels dedicated to red, green, and blue hues. The camera’s software then combines these pixels to produce a full-color image.
Setting Up Your OSC for Optimal Results
Setting up an OSC camera is relatively straightforward, but there are still some key considerations to ensure you get the best possible images. First, focus is critical. Spend time to get a sharp focus, as this will greatly affect the final image quality. Next, balance your exposure settings. You want to avoid both underexposure, which can bury details in shadows, and overexposure, which can wash out the highlights. Lastly, consider the temperature. OSC sensors can produce noise in long exposures, so cooling the camera, if possible, can help reduce this.
Streamlining the Astrophotography Process
Using an OSC camera can significantly streamline your astrophotography process. Since the camera captures color in one shot, you can bypass the time-consuming task of shooting separate exposures through different filters and then combining them. This not only saves time during your imaging session but also simplifies the post-processing workflow. With OSC, you can quickly go from setup to shooting, making the most of every clear night.
However, remember that OSC cameras have their limitations, particularly when it comes to capturing narrowband emissions in light-polluted areas. For this reason, many astrophotographers still use narrowband filters with their OSC cameras to isolate specific wavelengths of light, such as the hydrogen-alpha line, which can reveal stunning details in nebulae.
Comparing the Cosmos: Image Quality Side-by-Side
When comparing monochrome and OSC cameras, the difference in image quality can be quite significant. Monochrome cameras, with their higher sensitivity and ability to use narrowband filters, can capture more detail and contrast, especially in nebulae and other faint objects. OSC cameras, while more convenient, typically cannot match the level of detail that monochrome imaging allows.
Evaluating Detail and Resolution
Detail and resolution are where monochrome cameras shine. Without the Bayer filter, every pixel on a monochrome sensor is dedicated to capturing light, resulting in higher resolution and finer detail. This is especially noticeable when photographing objects with intricate structures, like the delicate filaments of a supernova remnant or the swirling arms of a distant galaxy.
Analyzing Color Fidelity and Noise Performance
Color fidelity and noise are other important aspects of image quality. OSC cameras can produce vibrant images with good color balance straight out of the camera. However, they can also introduce noise, particularly in the red and blue channels, which can be challenging to manage in post-processing. Monochrome cameras, on the other hand, paired with high-quality filters, can yield images with excellent color fidelity once processed, and generally exhibit less noise, due to their higher quantum efficiency.
For example, an image of the Orion Nebula captured with a monochrome camera and narrowband filters can reveal the subtle variations in ionized gas that a standard OSC camera might miss.
When it comes to noise, the absence of a Bayer filter means that monochrome cameras are inherently less noisy. This is because every pixel captures light, leading to a cleaner signal. In contrast, the interpolation required to create a color image from the OSC sensor’s Bayer matrix can introduce noise, which becomes more apparent when you’re processing the image to bring out faint details.
Precision in Practice: Tips for Stellar Snaps with Monochrome and OSC
Whether you’re using a monochrome or OSC camera, precision is key to capturing stunning astrophotos. A sturdy mount, accurate polar alignment, and a well-calibrated guiding system are fundamental. But there’s more to it than just hardware; technique plays a big role too.
For monochrome imaging, take the time to learn how to properly calibrate your images with darks, flats, and bias frames. This will help to reduce noise and correct for any imperfections in the optical system. With OSC, although you might not need as many calibration frames, it’s still important to take them to ensure the best color balance and image quality.
Achieving Focus and Precision Alignment
Focus and alignment are crucial in astrophotography. A slightly off focus can blur details, and poor alignment can introduce star trails or misshapen stars. Use a Bahtinov mask or an electronic focuser for precise focusing. For alignment, take the time to accurately polar align your mount, and if you’re using a GoTo system, ensure it’s well-calibrated to find your targets with ease.
Remember, the more accurate your setup, the better your images will be. It’s worth spending the extra time at the beginning of your session to get everything just right. This attention to detail will pay off when you see the crisp, clear images your efforts produce.
In the next and final section, we’ll explore the frequently asked questions about monochrome and OSC astrophotography. From the benefits of monochrome cameras to the suitability of OSC cameras for beginners, we’ll cover the essential information to help you make informed decisions and improve your astrophotography skills.
Monochrome vs. OSC Astrophotography: Understanding Key Differences & Techniques
Discovering the Universe Through Lenses
When you look up at the night sky, the stars seem to sparkle, as if inviting you to join them in a cosmic dance. For many, this allure is what draws them into the world of astrophotography. It’s a hobby that blends art, science, and patience, and offers the breathtaking reward of capturing the universe’s splendor. But as you dive into this hobby, you’re faced with a choice: should you use a monochrome camera or a One-Shot Color (OSC) camera? This decision will greatly influence your astrophotography experience.
Monochrome cameras record images in grayscale, capturing the intensity of light without color information. This might seem like a drawback, but there’s a significant advantage. Monochrome sensors are more sensitive to light, as they don’t use a Bayer filter to produce color. This allows every pixel to capture light, giving you three times more data, more sensitivity, and a clearer, more detailed image. For a deeper understanding, consider reading about when to switch to a mono astrophotography camera on AstroBackyard.
OSC cameras, on the other hand, provide convenience. With a built-in Bayer filter, they capture red, green, and blue light in a single exposure. This technology is akin to how our eyes perceive color, with the camera’s software combining these to create a full-color image. It’s a popular choice for astrophotographers who want quick results without the extra steps required by monochrome imaging.
The Battle of Light: Monochrome and OSC Defined
To better understand the differences, let’s define our contenders. Monochrome cameras use a single channel to record light intensity. OSC cameras have a Bayer filter that splits light into its primary colors. Each pixel of an OSC sensor captures only one color, and the camera’s software combines these to produce a full-color image.
Choosing a monochrome camera is like opting for a high-precision instrument. It’s not just about capturing black-and-white images; it’s about the potential to use filters effectively. By selecting specific wavelengths of light, such as those from hydrogen or oxygen in nebulae, you can cut through light pollution and uncover celestial structures in extraordinary detail.
Monochrome Magic: Harnessing Grayscale Granularity
Monochrome astrophotography’s power lies in its use of filters. You can isolate specific wavelengths, like hydrogen-alpha or oxygen-III, to reveal structures and compositions of astronomical objects. This ability to cut through light pollution and capture faint details is a game-changer.
Choosing the Right Monochrome Sensor
- Consider sensor size: Bigger sensors capture more sky but cost more.
- Quantum efficiency matters: It indicates how well photons are converted into electrons, key for capturing faint details.
- Pixel size counts: Larger pixels gather more light, crucial for long-exposure deep-sky imaging.
Selecting a monochrome sensor involves balancing size, efficiency, and pixel size. A sensor with high quantum efficiency will provide brighter images with less noise. Large pixels are advantageous for long exposures, capturing the whispers of distant galaxies.
Embracing monochrome astrophotography means appreciating subtle grayscale gradients. These can be transformed into vibrant celestial palettes through filtering and processing, revealing the universe’s beauty in a new light.
Picking Filters: Broadband vs. Narrowband
Filters are your astrophotography secret weapons. They control which light reaches your sensor, impacting image quality. Broadband filters are versatile, admitting a range of wavelengths. Narrowband filters are precision tools, isolating light from specific elements.
Choosing between broadband and narrowband filters depends on your targets. For galaxies or reflection nebulae, broadband filters suffice. To capture emission nebulae details or combat city light pollution, narrowband filters are essential.
Mastering Long Exposure Times
Patience is key in astrophotography, especially with monochrome cameras. Long exposures gather light for detailed images. Strike a balance: too short and you miss beauty, too long risks overexposure or tracking errors.
With practice, you’ll find the optimal exposure time for each object. Precise tracking and stability are essential for capturing crisp, clear images.
Comparing the Battle of Light: Image Quality Side-by-Side
Monochrome cameras offer more detail and contrast, especially in nebulae, due to their higher sensitivity and narrowband filter use. OSC cameras, while convenient, may not match monochrome imaging’s level of detail.
Monochrome cameras surpass OSC in detail and resolution. Without a Bayer filter, monochrome sensors dedicate every pixel to light capture, resulting in finer detail and higher resolution. This advantage is evident when photographing objects with intricate structures.
Color fidelity and noise are crucial in image quality. OSC cameras produce vibrant images but may introduce noise. Monochrome cameras, paired with quality filters, yield excellent color fidelity and generally exhibit less noise.
An example: An image of the Orion Nebula captured with a monochrome camera and narrowband filters reveals ionized gas details that a standard OSC camera might miss.
With monochrome and OSC cameras, precision is key. Focus and alignment are crucial, and a slight misfocus or poor alignment can blur details. Use tools like a Bahtinov mask or an electronic focuser for precise focusing. Accurate polar alignment is essential, and a well-calibrated GoTo system ensures easy target finding.
In astrophotography, capturing the beauty of the night sky can be as challenging as it is rewarding. Techniques like star stacking can significantly enhance the quality of the final image by reducing noise and bringing out fainter details. Whether you’re photographing distant galaxies or the Milky Way, understanding and mastering these techniques is essential for producing stunning celestial images.


Leave a Reply