
Key Takeaways
- To capture the wonders of the cosmos, finding the optimal exposure time is key to clear, vibrant astrophotography.
- Understanding the exposure triangle—ISO, aperture, and shutter speed—is essential for nailing the perfect shot.
- Using a tracking mount can significantly improve the quality of long-exposure astrophotography.
- Stacking multiple exposures can reduce noise and enhance detail in your night sky images.
- Start with test shots and use your camera’s histogram to fine-tune your exposure settings for the best results.
When you gaze up at the night sky, you’re not just looking at stars; you’re peering back in time. Capturing that timeless beauty requires more than just pointing and shooting. It’s about patience, precision, and understanding the dance of light and darkness. That’s what we’ll dive into today, so grab your gear, and let’s make some cosmic magic happen!
Why Exposure Matters
Imagine trying to catch a firefly with your camera in the dead of night. You need just the right amount of time to let in enough light without blurring its delicate dance. That’s the essence of exposure in astrophotography. Too short, and you’ll miss the faint glow of distant galaxies. Too long, and the stars will turn into streaks across the sky. It’s all about balance.
First Steps in Night Sky Photography
Before you even think about exposure times, get familiar with your surroundings. Choose a dark spot, far from the city lights, on a night when the moon isn’t too bright. This is your canvas, the vast expanse of the universe. Now, let’s talk about how to capture it.
First, you’ll want to set up your tripod and camera, making sure everything is stable. A shaky setup is like trying to paint on a rocking boat—it just won’t work. Next, focus your lens on a bright star or a distant light to ensure sharpness throughout your image.
Understanding Exposure: The Basics
Exposure is the amount of light that hits your camera’s sensor. It’s what determines whether your photo is bright, dark, or just right. The secret to mastering exposure lies in the exposure triangle: ISO, aperture, and shutter speed. Each element plays a crucial role, and together, they control the final look of your astrophotography masterpiece.
Defining Exposure Time
Let’s break it down. Exposure time, or shutter speed, is how long your camera’s sensor is exposed to light. In astrophotography, this can range from a few seconds to several minutes, depending on what you’re aiming to capture. But remember, the Earth is spinning, so if you expose for too long, the stars will start to trail.
The Exposure Triangle: ISO, Aperture, Shutter Speed
Now, the exposure triangle might sound like a mystical concept, but it’s actually pretty straightforward. ISO measures your camera’s sensitivity to light. A higher ISO lets you capture more light, which is great for dark conditions, but it can also introduce noise, or graininess, to your photos.
The aperture is the eye of your camera—the wider it opens (a lower f-number), the more light it lets in. But there’s a trade-off: a wide aperture can make focusing trickier, especially on the infinite canvas of the night sky.
Shutter speed is the final piece of the puzzle. It’s all about timing. Too fast, and you won’t catch the faint details. Too slow, and the stars will streak. Most importantly, these three elements must work in harmony to create a clear, detailed image of the night sky.
- ISO: Start with a setting around 800 to 1600. You want enough sensitivity to capture the stars without drowning your image in noise.
- Aperture: A wide aperture, like f/2.8 or f/4, will gather more light, but be careful not to sacrifice sharpness. Test and find the sweet spot for your lens.
- Shutter Speed: Begin with the 500 rule (500 divided by the focal length of your lens) to determine the maximum shutter speed before stars trail.
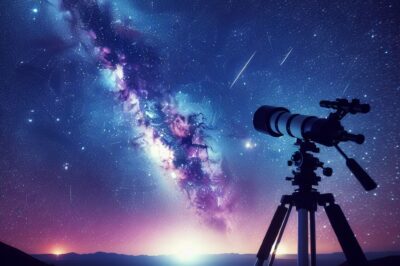
Equipment Essentials for Long Exposures
For those magical long exposures that bring out the colors and details of the Milky Way, you’ll need more than just a camera and lens. A tracking mount is your best friend here. It moves your camera in sync with the Earth’s rotation, keeping the stars pinpoint sharp even during long exposures.
Choosing the right equipment is like assembling your own spaceship before heading into the cosmos. You want gear that’s reliable and capable of capturing the faintest glimmers of starlight.
Choosing the Right Camera and Lens
Not all cameras are built for the darkness of space. You’ll want one with a sensor that can handle high ISOs without turning your photo into a grainy mess. A full-frame sensor is ideal, but don’t worry if that’s out of reach—a crop sensor can still work wonders with the right settings.
As for lenses, go wide and fast. A wide-angle lens, like a 14mm or 24mm with a large aperture, will let you capture more of the sky and gather more light. But remember, the wider you go, the shorter your exposure time to prevent trailing, due to the larger field of view.
And that’s just the start. Stay tuned for more tips and techniques to help you capture the night sky like a pro. With a little practice and a lot of passion, you’ll be creating celestial masterpieces in no time. Keep your eyes on the stars, and let’s continue this journey together.
The Role of a Tracking Mount
Imagine trying to take a perfect photo of a runner in motion; you’d need to follow their pace to keep them in focus. This is what a tracking mount does for the stars. As our planet rotates, the stars appear to move across the sky. A tracking mount, also known as an equatorial mount, compensates for this movement, allowing you to take long exposures without the stars turning into streaks.
Now, you might think, “Can’t I just use a regular tripod?” Well, a tripod keeps your camera still, which is great for most photography, but in astrophotography, stillness leads to star trails. A tracking mount moves your camera at the same rate as the stars, keeping them sharp and in focus.
There are different types of tracking mounts, from simple barn door trackers you can build at home to sophisticated motorized mounts that can track with incredible precision. Your choice will depend on your budget and how deep you want to dive into astrophotography. Remember, even a basic tracking mount can make a world of difference in your photos.
- Manual Tracking Mount: Great for beginners, requires you to manually adjust the mount to follow the stars.
- Motorized Tracking Mount: Offers automatic tracking, ideal for longer exposure times and serious astrophotography.
- GoTo Mount: Comes with a database of celestial objects and can automatically point your telescope or camera to them, perfect for pinpoint accuracy.
Setting Up for Success: Calculating Your Exposure
Once you’ve got your tracking mount ready, it’s time to calculate your exposure. This is where the magic happens. Think of it as a recipe; you need the right ingredients in the right amounts. The key ingredients are your ISO, aperture, and shutter speed, and the amount is the time you’ll expose your sensor to the stars.
Start with a moderate ISO, adjust your aperture according to your lens’s sweet spot, and then play with the shutter speed. You want to capture as much light as possible without overexposing your image. It’s a balancing act, but when you get it right, the results are breathtaking.
Don’t be afraid to experiment. Try different settings and see what works best for your equipment and the conditions you’re shooting in. And always, always take test shots. They’re like sketches an artist makes before the final masterpiece. They’ll guide you to the perfect exposure.
The 500 Rule
One of the golden rules in astrophotography is the 500 Rule. It’s a simple guideline to prevent star trailing. Just divide 500 by the focal length of your lens, and the result is the longest exposure (in seconds) you can use before the stars start to blur.
For example, if you’re using a 25mm lens, you’d calculate 500 / 25, which equals 20 seconds. This means you can expose your image for up to 20 seconds before the stars lose their pinpoint clarity. But remember, this is just a starting point. Your tracking mount might allow you to go longer, and your test shots will be the final judge.
Test Shots and Histograms
Test shots are your best friend. They tell you more about your exposure than the night sky ever could. Take a shot, then check your camera’s histogram—the graph that shows the range of tones in your image. What you’re looking for is a nice, gentle curve, not too far to the left or right. This means your exposure is just right, capturing the faint glow of the stars without washing out the details.
If the curve is leaning too far to the left, your photo is underexposed. Too far to the right, and it’s overexposed. Adjust your settings accordingly, take another test shot, and check again. This feedback loop will get you closer and closer to that perfect exposure.
Long-Exposure Techniques Explained
Long-exposure astrophotography is all about letting your camera drink in the light of the cosmos, slowly and steadily. It’s how you capture the kind of images that make people say, “Wow, I had no idea the night sky looked like that!”
But it’s not just about leaving the shutter open and hoping for the best. You need to control the light. Use a remote shutter release or your camera’s timer to avoid shaking the camera when you start your exposure. And if you’re going for really long exposures, consider using a cable release or an intervalometer to keep the shutter open without having to hold it down manually.
Stacking for Noise Reduction
Noise is the bane of many astrophotographers, but there’s a powerful technique to combat it: stacking. By taking multiple exposures of the same scene and combining them in post-processing, you can significantly reduce noise and bring out more detail in your images.
It works because noise is random, but the stars are not. When you stack images, the noise tends to cancel itself out, while the consistent light of the stars becomes stronger. You’ll need software to do this, but there are plenty of options out there, from free programs to professional-grade tools.
Light Pollution and Filters
Even in the darkest sky, light pollution can be a problem. It’s the unwanted light that washes out the night sky, and it can come from distant cities, nearby buildings, or even the moon. But don’t worry, there’s a way to cut through the glow: light pollution filters.
These filters attach to your lens or telescope and block out the wavelengths of light typically associated with artificial lighting. They can make a dramatic difference, turning a washed-out sky into a canvas of stars. Just make sure to get the right filter for your camera and the type of light pollution you’re dealing with.
Tips for Achieving Stellar Long-Exposure Shots
Finally, here are some tips to help you nail those long-exposure shots:
- Patience is key. Good astrophotography takes time, both in capturing and processing the images.
- Focus carefully. Use live view and zoom in on a bright star to achieve critical focus.
- Keep your camera warm. In cold conditions, batteries can drain quickly, and condensation can form on your lens. Insulate your gear to keep it functioning properly.
- Document your settings. Keep a log of what works and what doesn’t. This will save you time in future shoots.
- Enjoy the process. Astrophotography is as much about the experience as it is about the results. Soak in the beauty of the night sky as you capture it.
Armed with these techniques and a bit of practice, you’ll be well on your way to capturing the wonders of the night sky. Remember, every night is different, so what worked once may need tweaking the next time. Stay curious, keep experimenting, and let the stars be your guide.
Frequently Asked Questions (FAQ)
- What is the 500 Rule in Astrophotography?
- How Do I Reduce Noise in Long-Exposure Photos?
- Can I Do Astrophotography in Light-Polluted Areas?
- What Equipment Do I Need to Start Astrophotography?
- How Long Should My Exposures Be for Different Celestial Objects?
Embarking on the astrophotography journey sparks a constellation of questions. Whether you’re setting up your tripod for the first time or seeking to refine your technique, these FAQs will guide you towards clearer, more mesmerizing night sky images.
From mastering exposure times to reducing noise and combating light pollution, each answer below is a stepping stone to stellar photography. Equip yourself with this knowledge, and you’ll be capturing the heavens like never before.
So, let’s dive into these cosmic curiosities and shed some light on the common quandaries that might be clouding your astrophotography adventures.
Remember, the sky is not the limit—it’s just the beginning of astrophotography.
What is the 500 Rule in Astrophotography?
The 500 Rule is a quick guide to help prevent star trails in your photos. It’s a simple calculation: divide 500 by the focal length of your lens to find the maximum exposure time before stars appear to move. So, if you’re using a 50mm lens, you wouldn’t want to exceed a 10-second exposure (500 / 50 = 10). However, this is just a guideline; your camera’s sensor size and the precision of your tracking mount can also influence the optimal exposure time.
How Do I Reduce Noise in Long-Exposure Photos?
Reducing noise in long-exposure astrophotography is crucial for achieving crisp, detailed images. Here are a few strategies:
- Use a lower ISO setting to minimize the digital noise inherent in high-sensitivity settings.
- Employ image stacking techniques, where multiple shots are taken and then combined using software to average out the noise.
- Utilize in-camera noise reduction features, although be aware this can increase processing time between shots.
By implementing these methods, you’ll enhance the clarity of your night sky captures, allowing the true beauty of the stars to shine through.
Can I Do Astrophotography in Light-Polluted Areas?
While light pollution presents a challenge, it’s not a showstopper for astrophotography. Use light pollution filters to suppress unwanted wavelengths from artificial lights. Choose targets that are less affected by light pollution, such as planets or the moon, and consider traveling to darker sites when targeting fainter celestial objects. With persistence and the right equipment, even city dwellers can capture the cosmos.
What Equipment Do I Need to Start Astrophotography?
To begin your astrophotography journey, you’ll need:
- A camera capable of manual mode, allowing you to adjust ISO, aperture, and shutter speed.
- A sturdy tripod to keep your camera stable during long exposures.
- A wide-angle lens with a large aperture (low f-number) to capture as much light as possible.
- Optionally, a tracking mount to follow the stars’ movement and enable longer exposures without star trails.
With this basic setup, you’ll be well-equipped to start photographing the night sky and exploring the wonders of astrophotography.
How Long Should My Exposures Be for Different Celestial Objects?
The ideal exposure time in astrophotography varies depending on the celestial object you’re capturing and your equipment. Here’s a general guideline:
- For the Milky Way and star fields, exposures can range from 15 to 30 seconds without a tracking mount.
- For deep-sky objects like nebulae and galaxies, exposures may need to be several minutes long, and image stacking is often used.
- For sharp shots of the moon and planets, shorter exposures are typically better, often under a second.
Test shots are essential to determine the best exposure for your specific conditions and equipment. Start with these guidelines and adjust based on your results to capture the cosmos in all its glory.


