
Key Takeaways
- A tripod is essential for stability during long exposure shots needed for astrophotography.
- Manual camera settings like ISO, exposure time, and focus are key to capturing clear night sky images.
- Dark locations away from light pollution offer the best conditions for astrophotography.
- Editing apps can enhance your photos by adjusting color, brightness, and reducing noise.
- Even with a smartphone, you can capture celestial events and stunning shots of the Milky Way.
Choosing Your Gear: Smartphone Selection and Essential Accessories
When it comes to smartphone astrophotography, the right gear is half the battle. You don’t need the latest and greatest model, but a smartphone with manual camera controls will give you an edge. Look for features like the ability to adjust ISO, exposure, and focus. Besides the phone itself, a sturdy tripod is non-negotiable. It will keep your device steady during the long exposures necessary for capturing the night sky’s splendor.
Here are a few other accessories that can help:
- A remote shutter release to avoid shaking the camera when you press the button.
- A smartphone adapter for a telescope, if you plan to take your photography to the next level.
- A lens with a wide aperture to let in as much light as possible.
Remember, astrophotography is not about having the most expensive equipment, but rather understanding how to make the most of what you have.
Setting the Stage: Finding the Perfect Sky
Location is everything in astrophotography. You want to find a spot with minimal light pollution, where the stars are brightest and most visible. Use a light pollution map to find the darkest skies near you. The best conditions are on a clear, moonless night. Even a thin crescent moon can outshine faint stars and nebulae.
Consider the following when planning your outing:
- Check the weather forecast to ensure clear skies.
- Align your trip with the lunar calendar to avoid bright moonlight.
- Bring along a red flashlight to preserve your night vision.
With the right location, you’ll be amazed at what your smartphone camera can capture.
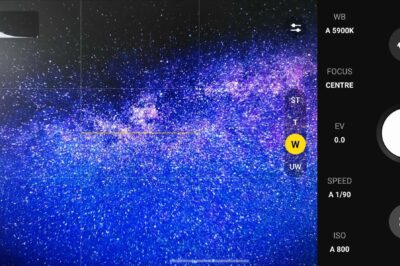
Mastering The Basics: Smartphone Camera Settings for the Night Sky
Understanding your smartphone’s camera settings is crucial for astrophotography. Most importantly, switch to manual mode if your phone has one. This will give you control over ISO, exposure, and focus, which are the pillars of a great night sky photo.
Manual Mode Mastery: ISO, Exposure, and Focus Adjustments
ISO measures your camera’s sensitivity to light. For night sky photography, you’ll want a higher ISO, but be cautious—too high and your photos will be grainy. Start around 800 and experiment from there. Next, set your exposure time. Longer exposures capture more light, which is perfect for stars, but too long and they’ll start to trail as the Earth rotates. Finally, set your focus to infinity to ensure the stars are sharp. To avoid star trails, familiarize yourself with the 500 rule in astrophotography.
Here’s a quick checklist:
- ISO: Start at 800 and adjust as needed.
- Exposure: Begin with 10 seconds and tweak for your conditions.
- Focus: Aim for infinity, but double-check that stars aren’t blurry.
Remember, every smartphone is different, so take the time to get to know your camera’s capabilities and limitations.
The Magic of Long Exposure: Capturing Star Trails and the Milky Way
Long exposure is the secret sauce of astrophotography. It allows your camera to soak up all the available light, revealing stars too faint for the naked eye. For star trails, exposures can last for several minutes, showing the path of stars as the Earth turns. If you’re after the Milky Way, aim for a balance that captures its glow without blurring the individual stars.
Here’s how to start:
- Use a tripod to keep your smartphone stable.
- Start with a 10-second exposure and increase as needed.
- Take multiple shots and stack them in editing software for a noise-free image.
With patience and practice, long exposure will let you capture the wonders of the night sky in ways you’ve never imagined.
The Art of Stability: Securing Your Smartphone for Sharp Images
Even the slightest movement can turn a crisp star into a blurry streak. That’s why a tripod is your best friend in astrophotography. It doesn’t have to be expensive, but it does need to be stable. A good tripod will hold your smartphone steady, allowing for those long exposures without any shake.
Types of Tripods: Pros and Cons
There are several types of tripods to consider when delving into astrophotography for beginners.
- Traditional tripods are sturdy and reliable, but can be bulky.
- Flexible tripods can wrap around objects for unique angles but may not support heavier phones or attachments.
- Compact tripods are great for travel but might not offer the height or stability of larger models.
Choose the one that best fits your needs, keeping in mind the trade-offs between portability and stability.
Stay tuned for more tips on capturing the cosmos with your smartphone, including editing tricks and how to share your stellar shots with the world.
Hands-Free Shooting: Using Remote Shutter and Timer Options
One way to ensure your smartphone doesn’t move during a shot is to use a remote shutter or the built-in timer. This means you can step away and avoid touching the phone altogether, eliminating the risk of camera shake. Most smartphones come with a timer function, and remote shutters can be connected via Bluetooth. They’re a small investment that can make a big difference in the quality of your astrophotos.
When setting up for a shot, here’s what to do:
- Mount your smartphone on the tripod and frame your shot.
- Set the timer to at least a few seconds, giving you time to step away.
- Alternatively, connect your remote shutter and trigger the shot from a distance.
This simple step ensures that your long exposure shots remain as sharp as the stars themselves.
Post-Processing Perfection: Fine-Tuning Your Astrophotos
Once you’ve captured the night sky, post-processing can take your images from good to great. This is where you can adjust exposure, bring out details, and reduce noise. Most smartphones will let you do basic edits, but for more control, transfer your images to a computer and use editing software.
Editing Apps 101: Enhancing Your Night Sky Images
There are many apps out there designed for photo editing, and some are even tailored for astrophotography. Apps like Adobe Lightroom, Snapseed, and Photoshop Express offer a range of tools to enhance your night sky images. You can adjust contrast, brightness, and color balance to make the stars stand out against the night sky.
Here’s a quick guide to get started with astrophotography for beginners.
- Import your photo into the app of your choice.
- Adjust the exposure and contrast to bring out the stars.
- Use the noise reduction feature to smooth out graininess without losing detail.
With these apps, you have the power to transform your images with just a few taps and swipes.
Color Correction and Noise Reduction Techniques
Color correction is important because different light sources can affect the color of the night sky in your photos. Look for any unnatural color tints and adjust the white balance to achieve true-to-life colors. Noise reduction is also key, as higher ISO settings can introduce grain. Be careful not to overdo it, though, as aggressive noise reduction can blur your stars.
To effectively reduce noise:
- Zoom in on your photo to see the graininess.
- Apply noise reduction gradually until the stars are smooth but still defined.
- Remember to save your edits as a new file to preserve the original.
By fine-tuning these aspects, you’ll end up with a cleaner, more vibrant photo that truly captures the beauty of the night sky.
Further Adventures in Astrophotography: Advanced Tools and Tricks
Once you’ve mastered the basics, there are more advanced techniques to explore in smartphone astrophotography. These can help you capture even more stunning and detailed images of the cosmos.
From Smartphone to Telescope: An Introduction to Afocal Imaging
Afocal imaging is a technique where you align your smartphone’s camera with the eyepiece of a telescope. This allows you to capture magnified images of celestial objects. You’ll need a special adapter to hold your phone in place, but the results can be spectacular. You can photograph the moon’s craters, Jupiter’s moons, or Saturn’s rings with clarity and detail.
Here’s how to get started:
- Attach the adapter to your telescope’s eyepiece.
- Secure your smartphone to the adapter and align the camera lens with the eyepiece.
- Focus the telescope as you normally would, then use your smartphone to capture the image.
With practice, afocal imaging can open up a whole new world of astrophotography possibilities.
Chasing Celestial Events: Tips for Shooting Meteors and Eclipses
Celestial events like meteor showers and eclipses are thrilling to capture with your smartphone. For meteor showers, find a dark spot and use a wide-angle lens to capture as much sky as possible. Set your phone to take continuous long exposures, and you might just catch a shooting star. During an eclipse, protect your camera’s sensor with a solar filter and use a tripod to capture the event’s various stages.
Remember these tips:
- Research the best times to view the event in your area.
- Use a tripod and remote shutter to avoid camera shake.
- Be patient—these events can last for hours, and timing is everything.
With preparation and a bit of luck, you’ll have a front-row seat to some of nature’s most awe-inspiring shows.
Share the Universe: Presenting Your Astrophotography to the World
After capturing the wonders of the night sky, sharing your images can be just as rewarding. Social media platforms like Instagram and Twitter are great places to start. Use relevant hashtags, engage with the astrophotography community, and you may find an audience that’s just as passionate about the cosmos as you are.
Building a Social Media Following for Your Space Shots
When sharing your astrophotos, consistency is key. Post regularly and interact with your followers. Share behind-the-scenes details of your shoots, and don’t be afraid to showcase your learning process. People love stories, especially when they’re about overcoming challenges to capture something beautiful.
Grow your following by:
- Posting high-quality images with interesting captions.
- Engaging with other astrophotographers and astronomy enthusiasts.
- Being active in online communities and participating in challenges.
As you build your portfolio, your journey through the stars might just inspire others to look up and explore the night sky for themselves.
Sharing your astrophotography captures can be as exhilarating as the process of taking them. Social media platforms like Instagram, Twitter, and specialized forums are excellent venues for showcasing your work. A well-crafted post can transport viewers right into the heart of the cosmos, igniting imaginations and inspiring others to look up and appreciate the night sky.
Building a Social Media Following for Your Space Shots
Building a following for your astrophotography involves more than just posting pictures. It’s about creating a narrative around your images. Share the stories of your stargazing adventures, the challenges you faced, and the techniques you used. Engage with your audience by asking questions and responding to comments. Offer tips to aspiring astrophotographers and encourage them to share their own experiences. This kind of interaction builds a community around your shared passion for the stars.
To grow your social media presence, consider these strategies:
- Post consistently and at times when your audience is most active.
- Use hashtags like #astrophotography, #nightsky, and #milkyway to reach a wider audience.
- Participate in online challenges and feature other astrophotographers’ work to foster community spirit.
By engaging authentically with the astrophotography community, you’ll find your audience naturally grows, and your work gains the appreciation it deserves.
Creating a Stellar Portfolio: Best Platforms and Practices
A portfolio is a curated collection of your best work, showcasing your skills and artistic vision. Platforms like 500px, Flickr, and even your own website are perfect for this. High-quality images with thoughtful descriptions will attract viewers and potential collaborators or clients. Regularly update your portfolio to reflect your improving skills and the new techniques you’ve mastered.
Example: “This shot of the Orion Nebula was captured using a 30-second exposure on a Samsung Galaxy S20. Notice the vibrant colors and the crispness of the stars, achieved through careful noise reduction and color correction in post-processing.”
Remember, your portfolio is your visual resume in the world of astrophotography. Make it count.
Frequently Asked Questions (FAQ)
Can I photograph deep space objects with my smartphone?
While smartphones are not ideal for deep space astrophotography due to their smaller sensors and lenses, you can capture some deep space objects like the Andromeda Galaxy or the Orion Nebula. Using a telescope with a smartphone adapter can greatly enhance your ability to photograph these distant wonders.
However, keep your expectations realistic and focus on mastering the art of capturing what’s within your smartphone’s capabilities. With the right techniques, even a simple shot of the night sky can be breathtaking.
How do I eliminate light pollution in my astrophotography shots?
Light pollution is the bane of astrophotographers. To minimize its effects, travel to a dark-sky location away from city lights. If that’s not possible, use apps like Light Pollution Map to find the darkest skies in your area. Additionally, some cameras and editing software offer light pollution filters that can help reduce the orange glow often seen in urban night skies.
What’s the best time of year to start astrophotography?
The best time for astrophotography is during the new moon phase when the sky is darkest. As for seasons, it depends on what you want to capture. Summer is great for the Milky Way, while winter offers long nights and the chance to photograph different constellations. Ultimately, any clear, dark night presents an opportunity to shoot the stars.
Do I need a high-end smartphone for astrophotography?
Not necessarily. While a high-end smartphone may offer better camera specs, even mid-range phones can capture impressive night sky photos with the right techniques. Focus on learning how to maximize your phone’s capabilities through manual settings, stabilization, and post-processing.
How can I avoid blurry photos when shooting the stars?
Stability is key to avoiding blurry astrophotos. Use a tripod to keep your smartphone still during long exposures. Also, utilize a remote shutter or the camera’s timer function to prevent shaking when you press the capture button. Ensuring your focus is set to infinity and fine-tuning your camera settings will also help achieve sharp images.
Astrophotography can be an incredibly rewarding hobby, but it does require some specialized knowledge and equipment. One of the first things you’ll need to learn about is the 500 rule, which is a simple guideline to help you avoid star trails and keep your stars looking sharp in your photos. With the right techniques and some practice, you’ll be able to capture stunning images of the night sky.


