
Stargazing is a hobby that opens a window to the universe, but it’s astrophotography that lets you capture and keep a piece of that infinite beauty. It’s a craft that combines the awe of astronomy with the creative expression of photography, and I’m here to guide you through the journey of transforming those twinkling stars into stunning photographs. Whether you’re a beginner or have been gazing upwards for a while, let’s unlock the secrets of astrophotography together.
Key Takeaways
-
Most telescopes can be used for astrophotography, but some features make it easier and yield better results.
-
An aperture of at least 80mm is recommended for capturing detailed and bright images of celestial objects.
-
A telescope’s focal length determines the magnification and field of view, crucial for framing your subject.
-
Equatorial mounts are preferred for astrophotography to counter Earth’s rotation and keep the stars sharp.
-
Even on a budget, there are ways to modify your equipment and techniques to capture the night sky effectively.
Choosing the Right Telescope for Dazzling Night Sky Images
When it comes to capturing the cosmos, not all telescopes are created equal. The right telescope can be the difference between a blurry blob and a crisp image of Jupiter’s bands or the craters on the Moon. The key is to choose a telescope that matches your astrophotography goals. Do you dream of deep-space galaxies or detailed lunar landscapes? Your answer will guide your choice.
The Basics of Telescope Astrophotography
Let’s get down to brass tacks. To photograph the night sky, you need a telescope that can track the stars as they move. This means it must have a sturdy mount and the ability to stay aligned with the celestial objects as the Earth rotates. Besides that, you need a camera that can be attached to the telescope, either through a special adapter or a built-in camera mount.
Types of Telescopes Explained
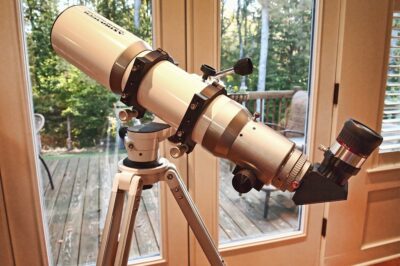
There are three main types of telescopes that you can use for astrophotography: refractors, reflectors, and catadioptrics. Each has its own strengths and challenges.
-
Refractors use lenses to gather light and are known for their sharp, high-contrast images. They’re great for photographing the Moon and planets.
-
Reflectors use mirrors and usually offer a larger aperture for the price, making them ideal for faint deep-sky objects like nebulae and galaxies.
-
Catadioptrics combine lenses and mirrors, offering a compact design and versatility for both planetary and deep-sky photography.
Most importantly, the choice depends on what you’re most interested in capturing and your budget. We’ll dive into the specifics of each type and what they’re best suited for in the next sections.
Must-Have Features for Astrophotography Telescopes
Now, let’s talk about the features you should look for in a telescope if you’re serious about astrophotography.
Aperture: The Key to Brighter Images
The aperture of a telescope is the diameter of its main optical component (lens or mirror). It determines how much light the telescope can gather. More light means brighter and more detailed images. For astrophotography, you’ll want an aperture of at least 80mm to ensure you can see enough detail and have a wide range of targets to shoot.
Focal Length and Its Role in Your Astro Images
Focal length is the distance from the telescope’s lens or mirror to the point where the image is in focus. It influences the magnification and field of view of your telescope. A longer focal length means higher magnification, which is great for planets and the Moon, but you’ll see less of the sky. A shorter focal length gives you a wider field of view, perfect for capturing larger objects like nebulae and galaxies.
-
Short focal length: Wide field, less magnification, great for deep-sky objects.
-
Long focal length: Narrow field, high magnification, ideal for planetary and lunar details.
Understanding Telescope Mounts
Before we delve into the specifics of telescope types, let’s talk mounts. They’re the unsung heroes of astrophotography. Without a proper mount, even the most sophisticated telescope won’t get you those crystal-clear images of the cosmos. The mount’s job is to counteract Earth’s rotation, allowing you to take long-exposure images without the stars turning into streaks of light. It’s a game-changer.
The mount is as crucial as the telescope itself. An equatorial mount is the most suitable for astrophotography because it can track the sky’s motion accurately. It aligns with Earth’s axis and rotates in one smooth motion, which means your camera can take long-exposure images without star trails.
Equatorial mounts are the gold standard for astrophotography. They are designed to follow the celestial sphere’s motion, making them ideal for tracking objects over long periods. Alt-azimuth mounts can also work, but they are better suited for visual observations or short-exposure photography because they don’t naturally compensate for the sky’s rotation.
Remember, capturing the heavens is not just about the right gear; it’s also about patience, practice, and passion. So grab your telescope, point it skyward, and let’s start this celestial journey together. With the right approach and equipment, the universe is yours to capture.
Simple Setup for Beginners in Astrophotography
Starting with astrophotography can feel like learning a new language, but it doesn’t have to be daunting. The key is to begin with a simple setup that you can gradually build upon. You want a telescope that is user-friendly and adaptable, allowing you to focus on learning the ropes without getting overwhelmed by complex equipment.
Many beginners find success with a basic refractor or a small reflector telescope mounted on a sturdy tripod. These setups can provide a solid foundation for your astrophotography journey, offering the necessary features without being too complex or heavy on the wallet.
First Telescope Options for the Stargazer
If you’re just starting out, consider a refractor telescope with an aperture of around 70mm to 80mm. These telescopes are generally more forgiving and easier to handle. They’re excellent for capturing the Moon, planets, and even some bright deep-sky objects. Plus, their design minimizes maintenance, which is a bonus when you’re just getting your feet wet in astrophotography.
Reflectors can also be a good starting point, especially if you’re interested in deep-sky objects. They usually offer a larger aperture at a lower cost compared to refractors. This means you can capture fainter stars and galaxies without breaking the bank. Just keep in mind that reflectors require a bit more maintenance, like collimation, to ensure the best image quality.
Camera Adaptable Telescopes for Easy Use
For instance, the Celestron AstroMaster 130EQ is a popular choice among beginners. It’s a reflector telescope that offers a good balance between portability, ease of use, and the ability to capture stunning images of celestial objects.
When it comes to attaching your camera, look for telescopes that come with a T-ring adapter. This small accessory allows you to attach your DSLR or mirrorless camera directly to the telescope, effectively using it as a giant camera lens. It’s a simple yet effective way to start capturing the night sky.
And don’t worry if you’re not ready to invest in a dedicated astrophotography camera. Many telescopes are compatible with standard cameras that you might already own, which means you can start taking photos of the night sky with the gear you have at home.
Remember, the key to successful astrophotography is not just the equipment but also understanding how to use it. Start with a simple setup, get comfortable with it, and then consider upgrading as you gain experience and confidence.
Advanced Equipment for Seasoned Astrophotographers
As you progress in your astrophotography adventure, you’ll likely feel the pull to upgrade your equipment. This is where the fun really begins. Advanced gear can take your images from ‘wow’ to ‘out of this world’.
Upgrading to a GoTo Mount
One of the first upgrades to consider is a GoTo mount. These mounts are motorized and computerized, meaning they can automatically point your telescope to a database of celestial objects. It’s like having a GPS system for the stars. This feature is invaluable for finding and tracking faint objects that might be difficult to locate manually.
GoTo mounts can be a significant investment, but the convenience and precision they offer make them a worthy addition to your astrophotography toolkit. With a GoTo mount, you’ll spend less time hunting for objects and more time capturing the beauty of the universe.
Cooling Cameras for Long Exposure Shots
Another upgrade to consider is a dedicated astrophotography camera with cooling capabilities. These cameras can keep the sensor at a consistent temperature, reducing noise and improving image quality during long exposures. Noise can be the bane of astrophotography, especially when you’re trying to capture faint details in the deep sky.
Cooling cameras are especially useful for capturing nebulae, galaxies, and other dim celestial objects. They allow you to take longer exposures without the image quality degrading, which is crucial for bringing out the faint details in your astro images.
Telescope Astrophotography on a Budget
Let’s face it, astrophotography can be an expensive hobby. But don’t let that discourage you. There are ways to get started without emptying your wallet. With a bit of ingenuity and some DIY spirit, you can optimize a basic telescope for astrophotography and still get impressive results.
Optimizing a Basic Telescope for the Night Sky
Start by using what you have. If you own a telescope for visual observation, you might be able to use it for photography with just a few tweaks. A simple motor drive can be added to many manual mounts to enable them to track the stars. You can also create a DIY dew shield to prevent lens fogging during those long, cold nights.
Additionally, you can use software to stack multiple images, enhancing the final photo without needing a high-end camera. Free programs like DeepSkyStacker combine your photos to improve signal-to-noise ratio, bringing out details that a single shot might not reveal.
Remember, creativity and resourcefulness are just as important as the gear you use. With a little bit of both, you can capture the cosmos on a shoestring budget and still produce images that sparkle with the magic of the universe.
DIY Modifications to Enhance Your Astrophotography
Even if your budget is tight, there are clever ways to enhance your telescope for astrophotography. For instance, you can make a ‘barn door’ tracker, a simple, hand-operated device that allows you to track stars with your camera. It’s a great project for those who enjoy a bit of DIY and it can yield surprisingly good results for wide-field astrophotography.
Another modification is to add a homemade light pollution filter to your setup. Using materials like mylar or even repurposed photographic film, you can reduce the effects of city lights on your astrophotography. While it won’t match the performance of commercial filters, it’s a start towards clearer, more contrasted images.
Lastly, don’t underestimate the power of software. Free tools can help you plan your astrophotography sessions, control your camera remotely, and even assist in post-processing your images. Stacking software, as mentioned earlier, can work wonders on the data you collect, pulling out details that are otherwise lost in single exposures.
Frequently Asked Questions
As you delve into the world of astrophotography, questions are bound to arise. Let’s tackle some of the most common queries to help you on your way.
What is a Good Beginner Telescope for Astrophotography?
A good beginner telescope for astrophotography is one that’s easy to use and has the capability to grow with you as you learn. A refractor with an aperture of 70-80mm is a great start. It’s simple, requires little maintenance, and is forgiving of beginner mistakes. The Celestron AstroMaster series is a popular choice, offering models that are easy to set up and use.
Can I Use My Regular Camera with a Telescope?
Yes, you can use a regular DSLR or mirrorless camera with a telescope. You’ll need a T-ring adapter to connect your camera to the telescope’s focuser. This setup allows your camera to use the telescope as a long lens, capturing the night sky in ways you can’t with standard photography gear.
How Important is the Telescope’s Aperture for Astrophotography?
The aperture is extremely important in astrophotography because it determines how much light your telescope can collect. A larger aperture allows you to capture fainter objects and provides more detail in your images. For deep-sky astrophotography, an aperture of at least 80mm is recommended, but the bigger, the better.
However, larger apertures also mean larger, heavier, and often more expensive telescopes. Balance your desire for a large aperture with what you can reasonably handle and afford. Remember, a smaller, more manageable telescope that gets used often is better than a large one that stays in the closet.
What Are Some Budget-Friendly Ways to Start Astrophotography?
Budget-friendly ways to start astrophotography include using your existing camera equipment with a new telescope, buying used gear, and utilizing free software for image processing. Look for entry-level telescopes with the capability to attach a camera, and don’t overlook the used market for some great deals on second-hand equipment.
How Can I Avoid Star Trails in My Astrophotographs?
To avoid star trails, you need to track the stars as they move across the sky. This can be achieved by using a motorized equatorial mount, which moves the telescope in alignment with Earth’s rotation. For shorter exposures, a sturdy tripod and careful timing can minimize trails. Additionally, stacking multiple short exposures can reduce or eliminate star trails in your final image.


