
Article-at-a-Glance
- Discover the art of creating high-resolution astrophotography mosaics.
- Learn the essentials of planning and capturing multiple sky regions.
- Explore the best equipment and software for seamless image stitching.
- Gain practical shooting tips to manage light pollution and moon phases.
- Get inspired to share your celestial creations with the astrophotography community.
Why Astrophotography Mosaics Are Worth the Effort
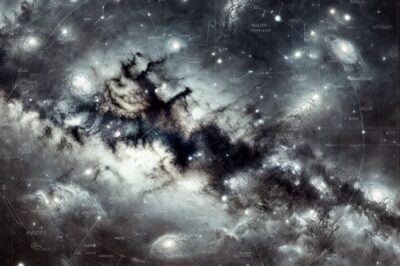
Imagine capturing the grandeur of the cosmos in a single image. That’s the magic of astrophotography mosaics. Mosaics allow you to photograph vast celestial landscapes with intricate details that would otherwise be impossible to fit into a single frame. They are the jigsaw puzzles of the night sky, where each piece is a snapshot of the universe, meticulously combined to reveal a masterpiece.
What Is an Astrophotography Mosaic?
An astrophotography mosaic is a collection of photographs, each capturing a portion of the night sky, which are then meticulously stitched together to form a larger, cohesive image. This technique is ideal for capturing expansive celestial objects or wide areas of the sky in stunning detail. It’s like using a zoom lens on the universe, allowing you to see the intricate patterns of nebulae, galaxies, and star clusters that are otherwise invisible to the naked eye.
The Enchanting Results of Patience and Precision
The process of creating an astrophotography mosaic can be challenging, but the results are truly enchanting. The high resolution and expansive view can reveal hidden treasures of the night sky, turning a simple photograph into an exploration of the cosmos. The key to a successful mosaic is patience and precision, as each image must align perfectly with its neighbors to create a seamless whole.
Piecing the Cosmos Together: The Planning Stage
Before venturing into the night with your camera and telescope, you need a solid plan. Planning is crucial because it determines the success of your mosaic. You’ll need to consider the target area, weather conditions, and the phases of the moon, among other factors. Here’s how to get started:
Selecting Your Target Areas
First things first, you need to decide what you want to capture. This could be a specific constellation, a large nebula, or an area of the Milky Way. Use a star map or an astronomy app to help you pinpoint the exact regions you want to include in your mosaic. Remember, the sky is vast, and choosing a target area will give you a focused starting point.
Once you’ve selected your target, it’s time to map out the individual panels that will make up your mosaic. Each panel should overlap slightly with its neighbors to ensure a smooth blend in the final image. A good rule of thumb is to aim for a 10-20% overlap between shots. This will give you enough common features in each image to align them accurately during post-processing.
Understanding the Scale and Overlap
Scale and overlap are the nuts and bolts of your mosaic. They determine how well the individual images will fit together. To get the scale right, you need to know the field of view your camera and telescope provide. This will guide you in planning how many panels you need to cover your target area.
Overlapping is like the safety net that catches any misalignment between panels. It ensures that when you stitch the images together, there’s enough common ground to create a smooth transition. You don’t want to end up with gaps or abrupt changes in brightness that can distract from the beauty of your final image.
Tools of the Trade: Equipment Essentials
Now let’s talk gear. The right equipment can make or break your astrophotography experience. Here’s what you’ll need:
Choosing the Right Camera and Telescope
The heart of your setup is the camera and telescope combo. A good quality DSLR or a dedicated astronomy camera will give you the image clarity needed for a stunning mosaic. Pair that with a telescope that has a suitable aperture and focal length for your target, and you’re set. Remember, the goal is to capture as much detail as possible.
For telescopes, a refractor or a reflector with a stable mount will do the trick. Stability is key because any movement can blur your images, making them difficult to stitch together later. Equatorial mounts are great for tracking the sky’s motion, keeping your target centered over long exposures.
As for cameras, a model with manual controls for exposure, focus, and ISO settings is essential. This allows you to fine-tune your settings to match the conditions of the night sky. And if you’re serious about detail, consider a camera with a full-frame sensor to capture more light and information.
Software for Seamless Stitching
Stitching software is the wizard behind the curtain, transforming your individual images into a single, breathtaking panorama of the stars. There are several options out there, but you’ll want software that can handle large file sizes and align images with precision. Popular choices among astrophotographers include Adobe Photoshop for its advanced features and Sequator for its simplicity and effectiveness.
- Adobe Photoshop: Offers extensive tools for manual alignment and blending.
- Sequator: User-friendly and specifically designed for astrophotography.
- PixInsight: Provides powerful processing capabilities for more experienced users.
When choosing software, consider your skill level and the complexity of your project. Some programs offer automated features that can save you time, while others give you more control over the final outcome. The key is to find a balance between functionality and ease of use.
Capturing the Heavens: Practical Shooting Tips
To capture the cosmos, you need more than just good equipment; you need the right techniques. Astrophotography is as much about skill as it is about gear. Here are some practical tips to help you get the best shots for your mosaic.
First, always shoot in RAW format. This gives you the highest quality images with the most data to work with during post-processing. Next, use a remote shutter release or your camera’s timer to avoid shaking the camera during exposure. Even the slightest movement can cause blurring, which is a no-go for high-resolution mosaics.
Focus is also crucial. Take the time to focus your telescope or lens accurately. A poorly focused image can’t be fixed in post-processing. Use a bright star and your camera’s live view zoom feature to fine-tune your focus until the star appears as a small, sharp point of light.
- Shoot in RAW format for maximum image quality.
- Use a remote shutter release or timer to prevent camera shake.
- Focus carefully using a bright star and live view zoom.
Optimal Camera Settings for Crisp Images
Optimal camera settings are the secret sauce to crisp, clear astrophotographs. Start with a low ISO to reduce noise—ISO 800 is a good starting point. Then, adjust your exposure time to collect enough light without causing star trails. This will vary depending on your tracking mount’s accuracy and the focal length of your telescope or lens.
Moon Phases and Light Pollution: Timing Your Sessions
The moon is both a friend and foe to astrophotographers. Its phases can dramatically affect the darkness of the sky. For the best conditions, plan your mosaic sessions around the new moon when the sky is darkest. Also, be mindful of light pollution. If you’re near a city, consider traveling to a darker location to avoid the glow that can wash out the faint details in your images.
The Digital Darkroom: Post-Processing Your Mosaic
After capturing all your panels, the next step is to bring them together in the digital darkroom. Post-processing is where your mosaic comes to life. It’s a multi-step process that involves stacking, aligning, and blending your images to create a seamless whole.
Stacking combines multiple images of the same panel to improve signal-to-noise ratio, resulting in cleaner, more detailed photos. Use software like DeepSkyStacker for this purpose. It’s specifically designed for astrophotography and can handle the large files you’ll be working with.
Stacking Your Shots: The First Steps to Cohesion
Stacking is your first defense against noise and your best friend for enhancing detail. By stacking multiple exposures of the same part of the sky, you average out random noise and boost the true signal from the stars. The result is a set of cleaner, more detailed panels ready to be stitched into your final mosaic.
Stitching Software: Creating a Celestial Tapestry
Once your images are stacked, it’s time to stitch them together. This is where your planning and overlap come into play. Good stitching software will use common stars or features in the overlapping regions to align each panel precisely. The goal is to make the seams between panels invisible, creating the illusion of a single, uninterrupted view of the night sky.
- DeepSkyStacker: Great for stacking images to reduce noise and enhance detail.
- Adobe Photoshop: Offers advanced tools for manual alignment and blending.
- PixInsight: For those seeking a deeper dive into image processing with robust features.
Remember, the key to a successful mosaic is in the details. Take your time with post-processing, and don’t be afraid to go back and re-stack or re-align if something doesn’t look quite right.
The Beauty of Resolution: Printing and Sharing Your Mosaic
Once your mosaic is complete, it’s time to show it off. The high resolution of a mosaic makes it ideal for large-format printing, allowing you to hang your piece of the universe on your wall. But before you print, ensure your image is properly calibrated for color and brightness to get the best results.
When it comes to sharing your work online, consider the platform. Social media sites often compress images, which can reduce their quality. Use platforms that support high-resolution uploads to maintain the detail of your mosaic. And don’t forget to engage with the astrophotography community—feedback from fellow enthusiasts can be both rewarding and educational.
Choosing the Right Medium for Printing
Choosing the right medium for printing is as important as capturing the images themselves. Fine art paper, canvas, and metal prints all offer different aesthetics and durability. Consult with a professional printer to determine the best medium for your mosaic’s size and color palette. They can also advise on any necessary image adjustments to ensure your print is as stunning as the night sky itself.
Sharing Your Work with the Stargazing Community
Once you’ve poured hours into creating your astrophotography mosaic, sharing it with others can be one of the most rewarding experiences. Whether it’s through social media, photography forums, or local astronomy clubs, the stargazing community is a fantastic place to find support and appreciation for your work. Here are some tips on how to share your mosaic effectively:
- Choose the right platform that preserves the quality of your images.
- Engage with other astrophotographers by joining forums and social media groups.
- Participate in local astronomy events or exhibitions to showcase your work.
Remember, your mosaic is not just a photograph; it’s a story of the universe that you’ve captured. Share the story behind your mosaic—the planning, the challenges, and the triumphs. This narrative adds depth to your work and can inspire others to embark on their own astrophotography adventures.
For example, when I shared my mosaic of the Orion Nebula, I included details about the nights I spent under the stars, the cold breezes I endured, and the excitement of seeing the final image come together. It sparked conversations and connections with people who shared similar experiences or aspired to create their own mosaics.
Final Thoughts: The Sky Is Not the Limit
Creating an astrophotography mosaic is a journey—a blend of art and science that pushes the boundaries of what we can capture and share. It’s an endeavor that challenges your patience and skills, but the reward is a unique and breathtaking view of the cosmos that you can call your own. So go ahead, plan your mosaic, capture the night sky, and stitch together your very own celestial masterpiece. Remember, in astrophotography, the sky is not the limit—it’s just the beginning.
Frequently Asked Questions (FAQ)
Here are some common questions about astrophotography mosaics answered to help you get started on your celestial photography journey.
How long does it typically take to create an astrophotography mosaic?
The time it takes to create an astrophotography mosaic can vary widely, depending on the size and complexity of the target area, the equipment used, and the photographer’s experience level. It can take anywhere from a few nights to several months to capture all the necessary images. Post-processing can add additional hours or days to the project. Patience is key!
Can I create a mosaic with a basic DSLR camera?
Yes, you can create an astrophotography mosaic with a basic DSLR camera. The most important factors are manual control over exposure settings and the ability to shoot in RAW format. A DSLR camera paired with a good lens or telescope can yield excellent results for your mosaic.
What are the best software options for stitching astrophotography images?
There are several software options for stitching astrophotography images. Some of the most popular include:
- Adobe Photoshop: Known for its advanced features and flexibility.
- Sequator: A user-friendly option designed for astrophotography.
- PixInsight: A powerful tool for experienced astrophotographers.
Choose the software that fits your skill level and the specific needs of your mosaic project.
How can I ensure my mosaic images align correctly?
To ensure your mosaic images align correctly, follow these steps:
- Plan your mosaic carefully, ensuring each panel overlaps by about 10-20%.
- Use a stable mount and consistent camera settings to maintain uniformity across panels.
- Employ precise focusing techniques to ensure sharpness throughout.
- Utilize software with robust alignment tools during post-processing.
Take your time and check the alignment at each step of the stitching process.
What are some common pitfalls to avoid when starting astrophotography mosaics?
When starting astrophotography mosaics, watch out for these pitfalls:


