
Key Takeaways
- The 400 Rule helps prevent star trails by calculating the maximum shutter speed for clear night sky photos.
- Essential gear includes a reliable camera, a wide-aperture lens, a sturdy tripod, and optional filters.
- Scouting for dark skies and planning around weather and moon phases are crucial for successful astrophotography.
- Adjust the 400 Rule based on your camera’s sensor size to maintain image sharpness.
- Post-processing is a vital step to enhance and share the beauty of your astrophotography captures.
A Starry Quest: Perfecting Astrophotography Shots with the 400 Rule
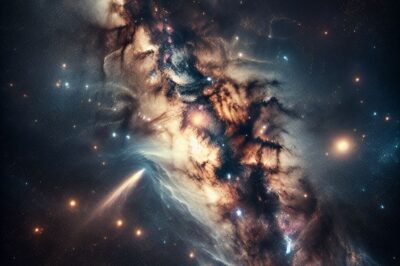
Have you ever gazed up at the night sky and wished you could capture its majestic beauty? With the right techniques, you can freeze the motion of the stars and bring the wonders of the cosmos right into your photo album. Let’s dive into the magic of the night sky and learn how to take stellar photographs that sparkle with clarity.
Capturing the Cosmos: An Overview
When we talk about astrophotography, we’re referring to the art of photographing celestial events and objects in the night sky. This includes everything from the moon and stars to planets and distant galaxies. While it might seem daunting at first, with a bit of guidance and practice, you can take breathtaking photos that light up the night.
Most importantly, to achieve those crisp, clear shots of the stars without any trails, you’ll need to understand and apply the 400 Rule. This simple yet powerful guideline will be your north star in the quest for perfect astrophotography.
The 400 Rule Unveiled: Maximizing Clarity in the Stars
- Identify your camera’s sensor size and the focal length of your lens.
- Apply the 400 Rule: Divide 400 by your lens’ focal length to find the longest shutter speed you can use without star trailing.
- Adjust the rule for crop sensors by taking into account the crop factor.
The 400 Rule is a guideline that helps you determine the ideal shutter speed to avoid star trails in your astrophotography. Star trails occur when your camera’s shutter is open long enough for the Earth’s rotation to make stars appear as streaks rather than points of light. By using the 400 Rule, you’ll keep those stars sharp and your night sky stunning.
Let’s say you’re using a lens with a 20mm focal length on a full-frame camera. According to the 400 Rule, you’d divide 400 by 20 to get a shutter speed of 20 seconds. This is the maximum time you can expose your photo without the stars starting to streak.
Example: For a 20mm lens on a full-frame camera, the calculation is 400 / 20 = 20 seconds.
But what if you’re using a camera with a crop sensor? You’ll need to adjust the calculation by multiplying the focal length by your camera’s crop factor before dividing by 400. This compensates for the sensor’s smaller size and ensures your stars remain pinpoint.
Weather and Moon Phases: Natural Elements that Influence Your Shoot
Before setting out on your astrophotography journey, it’s crucial to consider two natural factors that can make or break your photo session: weather and the moon’s phases. Clear skies are a given, but also aim for nights when the moon is less prominent in the sky. A new moon night is ideal because the darkness accentuates the faintest stars, allowing for a more dramatic capture.
The 400 Rule in Depth
The 400 Rule isn’t just a random number; it’s rooted in the celestial dance of the Earth and stars. As our planet rotates, the stars appear to move across the sky. If the shutter speed is too slow, this movement blurs the stars into trails. The 400 Rule helps us capture the stars as sharp points by limiting the time the camera’s shutter is open.
Understanding the Science Behind the Rule
The science behind the 400 Rule is quite simple. It’s all about the Earth’s rotation. Our planet spins at a steady rate, and as it does, the stars appear to move across the sky. This movement is what causes star trails in long exposure photographs. The 400 Rule gives us a mathematical way to counteract this movement, by setting a shutter speed that’s fast enough to freeze the stars in place, yet slow enough to let in enough light for a good exposure.
Calculating Your Exposure Time Precisely
To calculate your exposure time precisely, first find out the focal length of your lens. Then, divide 400 by that number. The result is the longest shutter speed you can use before the stars start to streak. If you’re using a 50mm lens, for example, your calculation would be 400 divided by 50, which equals 8 seconds. Stick to this shutter speed or faster to keep the stars as sharp as possible.
Remember, the 400 Rule is a starting point. Depending on the sharpness you desire and the characteristics of your camera and lens, you may need to adjust the rule. Experimentation is key. Take several shots at different shutter speeds to find the sweet spot for your equipment. For more detailed guidance, consider reading our astrophotography camera settings guide.
Adjusting the 400 Rule for Different Camera Sensors
Camera sensors come in various sizes, and this affects how you should apply the 400 Rule. For a crop sensor camera, you’ll need to account for the crop factor. This is typically between 1.5 and 1.6 for most APS-C sensors. Multiply the focal length of your lens by this factor to find the effective focal length, then divide 400 by that number.
For example, if you’re using a 20mm lens on a camera with a 1.5 crop factor, the effective focal length is 30mm. Therefore, the calculation for the maximum shutter speed becomes 400 / 30, which is approximately 13 seconds. To learn more about optimal settings, check out our astrophotography shutter speed guide.
Techniques for Stellar Success
With the 400 Rule in your toolkit, let’s focus on some techniques to ensure success in your astrophotography endeavors.
Focusing in the Dark: Sharp Stars Every Time
Focusing at night can be challenging. To ensure sharp stars every time, switch your lens to manual focus. Use your camera’s live view mode and zoom in on a bright star. Adjust the focus until the star is a tiny, sharp point of light. This method, known as the “focus magnification” trick, is a game-changer for achieving perfect focus in the dark.
Managing Noise: Balancing ISO and Exposure
High ISOs are often necessary for night photography, but they come with the trade-off of increased noise. To manage noise, start with the lowest ISO that allows you to capture the sky’s details. Increase it only as much as needed to get a good exposure with your chosen shutter speed and aperture. Modern cameras perform remarkably well at higher ISOs, so don’t be afraid to push the limits if needed.
- Start with a low ISO and increase only as necessary.
- Use noise reduction software in post-processing to clean up your image.
- Take test shots and examine them for noise before settling on your settings.
Besides that, take advantage of your camera’s noise reduction features. Many cameras offer long exposure noise reduction settings that can help minimize noise right in the camera. For more detailed information, consider reading our astrophotography shutter speed guide which includes tips on camera settings.
Advanced Methods: Tracking and Blending Exposures
For those looking to take their astrophotography to the next level, consider tracking and blending exposures. Tracking involves using a motorized mount that follows the stars’ movement, allowing for longer exposures without star trails. Blending exposures is a post-processing technique where you combine multiple images to balance the exposure of the sky and foreground.
These advanced methods can significantly improve the quality of your night sky images, but they require practice and patience to master.
From Capture to Exhibit: Processing Your Night Sky Images
Once you’ve captured the night sky, the next step is to bring those images to life through processing. This is where you can truly make your photos shine.
- Use software like Adobe Lightroom or Photoshop for adjustments.
- Enhance contrast, clarity, and color to bring out the details in the stars.
- Consider stacking images for noise reduction and detail enhancement.
Processing is an art in itself, and it’s here that you can correct for any imperfections and enhance the natural beauty of the night sky. Take your time and experiment with different adjustments to find the look that you love.
Software Selection: Choosing the Right Tools for Editing
Choosing the right software is crucial for editing your astrophotography images. Adobe Lightroom and Photoshop are industry standards that offer a wide range of tools for both beginners and professionals. For stacking and noise reduction, software like DeepSkyStacker and Sequator can be incredibly useful.
Each software has its strengths, and it’s worth exploring them to see which one fits your workflow best. With the right tools, such as those detailed in the Astrophotography 101 guide, you can turn a good photo into a great one.
Enhancement Tips: Bringing Out the Beauty of the Night Sky
Editing your astrophotography images isn’t just about correcting flaws; it’s an opportunity to enhance the natural splendor of the cosmos. Play with contrast to make the stars pop, adjust clarity to reveal the delicate structures of the Milky Way, and fine-tune colors to reflect the true hues of celestial objects. It’s your chance to communicate the awe of the night sky through your unique artistic vision.
Sharing Your Work: Best Practices for Presentation
Once your masterpiece is ready, it’s time to share it with the world. Whether you’re posting online or printing your work, presentation matters. For digital displays, ensure your images are properly resized and compressed to maintain quality. If you’re printing, choose a reputable lab and consider printing on metallic paper to make those starry nights truly shimmer.
The Unfinished Canvas: Next Steps After Mastering the 400 Rule
Mastering the 400 Rule is just the beginning of your astrophotography journey. The night sky is an ever-changing canvas that beckons you to keep exploring, learning, and capturing its mysteries. So, what’s next after you’ve nailed down the basics? It’s time to push the boundaries and explore new techniques, subjects, and challenges.
Expanding Your Astrophotography Skills
Expand your astrophotography skills by delving into deep-sky imaging to capture distant galaxies and nebulae, or try your hand at solar and lunar photography. Each of these subjects requires specialized techniques and equipment, but the thrill of capturing the universe’s grandeur is well worth the effort.
Joining Communities: Learning and Sharing with Fellow Enthusiasts
Joining astrophotography communities, both online and in-person, can be incredibly rewarding. Sharing your experiences, learning from others, and even collaborating on projects can enhance your skills and deepen your enjoyment of this fascinating hobby. Look for local astronomy clubs or online forums to connect with like-minded enthusiasts.
Frequently Asked Questions
What Makes the 400 Rule Superior to the 500 Rule?
The 400 Rule is often considered superior to the 500 Rule because it provides a more conservative shutter speed, reducing the likelihood of star trails in your images. The 500 Rule may allow for longer exposures, but this can lead to slightly blurred stars, especially with today’s high-resolution cameras.
How Can I Avoid Star Trails in Long Exposure Shots?
To avoid star trails, adhere to the 400 Rule, and consider using a tracking mount to compensate for the Earth’s rotation. Additionally, stacking multiple shorter exposures can reduce the appearance of trails while still capturing the night sky’s brilliance.
Do I Need a Full Frame Camera for Better Astrophotography?
While full-frame cameras are excellent for astrophotography due to their larger sensors and better low-light performance, they are not a necessity. Many crop sensor cameras are capable of producing stunning astrophotos. It’s more about understanding your camera’s capabilities and using the right techniques.
Is Manual Focus or Autofocus Better for Astrophotography?
Manual focus is generally better for astrophotography because it allows for more precise control when focusing on stars. Autofocus can struggle in low light conditions and may not provide the sharpness required for stellar images.


