
Key Takeaways
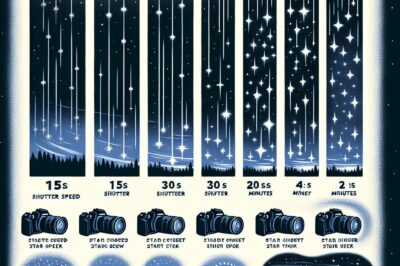
- Optimal shutter speed for wide-angle astrophotography is typically between 20-30 seconds to avoid star trails and capture clear night skies.
- The “500 Rule” helps prevent star trails by calculating the maximum shutter speed based on your camera’s sensor and lens focal length.
- For deep-sky astrophotography, long exposures can range from several minutes to multiple hours, often requiring a tracking mount.
- ISO settings should complement shutter speed to minimize noise while ensuring adequate light capture; start between 800-1600 ISO.
- Focusing at night requires manual adjustments, often setting the lens to infinity or using live view to focus on a bright star.
Why Shutter Speed Matters for Stellar Shots
Imagine a canvas where light dances across the sky, creating a symphony of stars. That’s what we aim for in astrophotography. But capturing this celestial ballet requires understanding a crucial element: shutter speed. It controls how long your camera’s sensor is exposed to light, and in the vast darkness of the night sky, every second counts. The right shutter speed means the difference between a crisp, star-filled image and a blurry mess of light trails.
Setting the Stage for Cosmic Captures
Before we delve into the nitty-gritty of shutter speeds, let’s set up our stage. You’ll need a camera that allows manual control of settings, a sturdy tripod to keep everything rock-steady, and a remote shutter release to avoid camera shake. Most importantly, find a dark spot away from city lights to let the stars shine bright. Now, with your stage set, let’s talk about how to capture the cosmos.
Shooting Stars: Selecting Your Shutter Speed
Choosing the right shutter speed is a game of balance. Go too long, and the Earth’s rotation will turn pinpoints into streaks. Too short, and you’ll miss the faint glow of distant stars. But don’t worry, I’ll guide you through finding that sweet spot for your camera.
Starlit Skies: Recommended Shutter Speeds
For wide-angle shots of the Milky Way or the night sky, start with a baseline of 20-30 seconds. This range is a solid starting point to capture enough light without the stars starting to trail. But remember, every sky is different, and adjustments are key.
Example: If you’re shooting with a 24mm lens on a full-frame camera, start with a 20-second exposure. Check your results, and adjust as needed. If the stars are sharp, you’ve nailed it. If not, tweak the time until they’re just right.
Galactic Glimpses: Long Exposures for Deep Sky Objects
Deep-sky objects like nebulae and galaxies demand patience and long exposures. We’re talking minutes to hours, not seconds. This is where a tracking mount becomes your best friend, moving your camera in sync with the stars to avoid trails during those long captures.
But remember, longer exposures amplify any mistakes. Ensure your focus is spot on, and double-check your framing. The reward? A stunning image of deep space that’ll make the wait worthwhile.
Mockup the Milky Way: Practical Tips and Techniques
As you venture out to mockup the Milky Way, remember that preparation is key. You’ve got your gear, you’ve found a dark spot, and you’re ready to shoot. But capturing the Milky Way isn’t just about pointing your camera up and hoping for the best. It’s about understanding the interplay of light and dark, composition, and timing.
Catching the Galaxy’s Glow: Ideal Conditions and Composition
For the Milky Way to really pop in your photos, you need clear, dark skies. Check the moon phase before you go out; a new moon is best for minimal light pollution. As for composition, include interesting foreground elements to add depth to your celestial scene. A lone tree, a silhouetted mountain, or an abandoned structure can anchor your shot and give it a sense of place.
Avoiding Star Trails: Using the 500 Rule
Star trails can be beautiful, but if you’re after crisp, clear stars, you’ll want to avoid them. The 500 Rule is a simple guide to help you do just that. Divide 500 by the focal length of your lens to find the maximum shutter speed before stars begin to trail. For example, with a 24mm lens on a full-frame camera, you shouldn’t exceed a 20-second exposure.
But remember, this is just a guideline. Different cameras and lenses might need slight adjustments. The key is to experiment and check your results after each shot.
Now, let’s dive into some post-processing magic to make your nightscapes truly shine.
From Darkness to Development: Post-Processing Your Nightscapes
After a night under the stars, you’ll have a memory card full of potential. But it’s in post-processing that these raw images transform into the stunning shots you envisioned. Whether you use Lightroom, Photoshop, or another editing software, a few basic adjustments can make a world of difference.
Enhancing Starlight: Basic Adjustments in Editing Software
Start by tweaking the exposure and contrast to bring out the details in the Milky Way. Play with the highlights and shadows to find a balance that gives your image depth without losing the subtlety of the stars. Clarity and sharpness adjustments can help define the stars, but be cautious not to overdo it and introduce noise.
Example: In Lightroom, gently slide the clarity up to add definition to the Milky Way, and use noise reduction to keep the sky clean and smooth.
Color adjustments are equally important. The night sky isn’t just black; it’s full of color. Adjust the white balance and saturation to bring out the natural hues of the stars and the Milky Way. Just a hint of blue or purple can add a magical touch to your nightscapes.
Stacking Stars: Advanced Techniques for Clearer Skies
If you’re ready to take your astrophotography to the next level, consider star stacking. This technique involves taking multiple shots of the same scene and combining them in post-processing to reduce noise and enhance details. It requires patience and a bit of technical know-how, but the results can be breathtaking.
Software like DeepSkyStacker or Sequator can help you align and stack your images. Just remember to keep your camera settings consistent across all shots and use a remote shutter to avoid any camera movement between exposures.
The Eternal Exposure: Long-Term Techniques for Timeless Images
Long-term exposure techniques are the secret to capturing the ethereal beauty of the night sky. Whether you’re creating star trails or capturing the faint light of distant galaxies, the right approach can turn a good shot into a timeless image.
Tracking the Heavens: Using Star Trackers for Pinpoint Precision
For those truly committed to the art, a star tracker is an invaluable tool. By aligning with the Earth’s rotation, star trackers allow for longer exposures without the worry of star trails. This means you can capture the night sky with incredible detail and clarity.
While setting up a star tracker takes extra time and equipment, the payoff is worth it. With a tracker, exposures of several minutes become possible, revealing the night sky in a way that’s simply not achievable with a static tripod setup.
Light painting is a technique that can add a whole new dimension to your astrophotography. By using a light source, like a flashlight or LED panel, you can illuminate foreground elements, giving depth and context to the celestial spectacle above. It’s a delicate dance between light and shadow, so start with a low-intensity light and gradually increase it until you find the perfect balance.
Light painting isn’t just about making your foreground visible; it’s about creating a visual harmony between earth and sky. The warm glow of a tent, the textured details of rocks, or the rugged outline of a tree can transform a simple shot of the stars into a storytelling masterpiece.
Light Painting the Landscape: Adding Foreground Interest
When you’re out in the field, try different light painting techniques to see what works best for your scene. Sometimes, a brief flash of light is all you need; other times, you might want to paint the light across your scene slowly. Remember, the goal is to complement the stars, not compete with them.
This is Not the End: Continuous Learning and Experimentation
Mastering astrophotography doesn’t happen overnight. It’s a journey of continuous learning and experimentation. Every night sky is unique, and there’s always something new to discover. So keep shooting, keep experimenting, and most importantly, enjoy the process of capturing the universe.
Whether you’re refining your technique, trying out new gear, or exploring new locations, there’s always room for growth. And with each shot, you’ll get closer to capturing the awe-inspiring beauty of the night sky. For those just starting out, consider reading this astrophotography guide for beginners to help you get started.
Frequently Asked Questions (FAQ)
Astrophotography is a complex art, and it’s natural to have questions. Let’s tackle some of the most common ones to help you on your journey to capturing the cosmos.
What is the best shutter speed for photographing the Milky Way?
The best shutter speed for photographing the Milky Way is typically between 20-30 seconds for a wide-angle lens on a full-frame camera. This allows you to capture enough light to reveal the galaxy’s details without creating star trails due to the Earth’s rotation. For more detailed guidance, consider exploring the 500 rule astrophotography guide which can help you achieve sharp stars in your photography.
However, this is just a starting point. Factors like your camera’s sensor size, the focal length of your lens, and the level of ambient light pollution will influence the ideal shutter speed for your specific situation.
How do I prevent star trails in my astrophotography?
To prevent star trails, adhere to the “500 Rule,” which suggests that you divide 500 by the focal length of your lens to find the maximum shutter speed before stars begin to trail. For example, if you’re using a 24mm lens on a full-frame camera, try not to exceed a 20-second exposure.
It’s also crucial to use a sturdy tripod and a remote shutter release to minimize camera shake during the exposure. If you’re aiming for very long exposures, consider investing in a star tracker to counteract the Earth’s rotation.
Is it necessary to use a star tracker for astrophotography?
While not strictly necessary, a star tracker can significantly enhance your astrophotography, especially for long exposures. It allows you to take sharp, detailed images of the night sky without the stars appearing to move or trail. If you’re serious about astrophotography, a star tracker can be a valuable addition to your toolkit.
Can I do astrophotography with a basic DSLR?
Absolutely! You don’t need the most expensive camera to start with astrophotography. A basic DSLR is capable of taking stunning images of the night sky. The key is to understand and utilize the manual settings effectively, especially the aperture, ISO, and shutter speed.
How do I focus on stars in the dark?
Focusing on stars in the dark can be challenging, but there are techniques to help you. One method is to use your camera’s live view mode and digitally zoom in on a bright star. Then, manually adjust the focus until the star appears as a small, sharp point of light. Some photographers also use the infinity focus mark on their lens as a starting point and then fine-tune from there.
Remember, practice makes perfect. The more you shoot, the more familiar you’ll become with your camera’s capabilities and limitations. With time, focusing on the stars will become second nature.
There you have it, celestial visual adventurers—a comprehensive guide to mastering shutter speed in astrophotography. Take these tips, grab your gear, and head out into the night. The cosmos awaits your lens, and the stories you’ll capture will be as infinite as the stars themselves. Clear skies and happy shooting!


