
When you set your sights on the largest planet in our solar system, you’re embarking on an awe-inspiring journey. Jupiter, with its swirling storms and majestic bands, beckons photographers and astronomers alike. But how do you capture such a distant world with a camera? Let’s dive into the world of Jupiter photography, where we’ll explore the tips and techniques that will help you snap stunning images of this gas giant.
Key Takeaways
- Understand the unique features of Jupiter to capture detailed images.
- Learn the best times for Jupiter photography to ensure high-quality shots.
- Choose the right telescope and camera gear tailored for planetary imaging.
- Master camera settings and telescope alignment for the sharpest images.
- Overcome atmospheric challenges and learn post-processing techniques to enhance your photos.
Capturing the Gas Giant: A Beginner’s Guide to Jupiter Photography
Understanding Jupiter’s Unique Features
Jupiter is not just another point of light in the sky; it’s a dynamic world with features that are both a challenge and a thrill to capture. Its fast rotation, large size, and bright moons make it a fascinating subject for photographers. Here’s what you need to know:
- Jupiter’s day is just under 10 hours long, meaning its features shift rapidly.
- Its bands and Great Red Spot are prime targets for your lens.
- The four Galilean moons—Io, Europa, Ganymede, and Callisto—can add drama to your composition.
Best Times to Photograph Jupiter
Timing is everything when it comes to astrophotography. For Jupiter, the best time to capture its glory is during opposition, when Earth is directly between Jupiter and the sun. This is when Jupiter is closest to us, appearing larger and brighter in the sky. Generally, this occurs once every 13 months. Keep an eye on the astronomical calendar and plan your photography sessions around this event for the most detailed shots.
Equipment Essentials for Jupiter Imaging
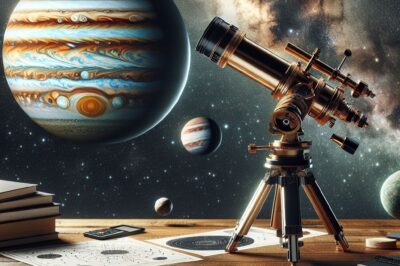
Choosing the Right Telescope
The telescope is your most crucial tool in capturing Jupiter. While many types are available, not all are suitable for planetary imaging. You’ll want one that provides a clear, magnified image of the planet.
Reflector vs. Refractor Telescopes
Reflectors use mirrors, while refractors use lenses. Reflectors are generally more affordable and better for deep-sky photography, but refractors provide sharper images for planets like Jupiter. Choose a refractor with a high focal ratio (f/10 or above) for the best results.
Importance of Aperture Size
The aperture is the diameter of your telescope’s primary lens or mirror, and it determines how much light your telescope can gather. The larger the aperture, the more details you can see and photograph on Jupiter. A minimum of 4 inches (100mm) is recommended for planetary photography.
Must-Have Camera Gear
Dedicated Astrophotography Cameras
If you’re serious about capturing the finest details on Jupiter, consider a dedicated astrophotography camera. These cameras are designed to handle the low light conditions of space and can take rapid exposures to freeze Jupiter’s swift rotation.
Example: The ZWO ASI462MC is a popular choice among astrophotographers for its sensitivity and high frame rate, perfect for capturing Jupiter’s dynamic atmosphere.
Adapting DSLR/Mirrorless Cameras for Space Shots
You can also use a DSLR or mirrorless camera for Jupiter photography. These cameras are versatile and can be attached to your telescope with the right adapter. When using these cameras, shoot in RAW format for the highest quality images and the most post-processing flexibility.
Accessories That Make a Difference
Barlow Lenses for Magnification
A Barlow lens is a fantastic accessory that can double or triple the effective focal length of your telescope, bringing Jupiter closer in your viewfinder. When choosing a Barlow lens, opt for one that maintains image quality while providing the magnification you need.
Filters to Enhance Details
Filters are not just for Instagram—they’re essential for astrophotography too. They can help you cut through atmospheric turbulence and bring out specific details on Jupiter’s surface. A color filter set can enhance the visibility of the cloud bands and the Great Red Spot.
By following these guidelines and choosing your equipment wisely, you’re setting yourself up for a successful foray into Jupiter photography. Remember, practice makes perfect, so don’t be discouraged if your first few attempts aren’t what you envisioned. With persistence and the right gear, you’ll be capturing the king of planets like a pro in no time.
Fine-Tuning Telescope Alignment
Once you’ve got the right telescope and camera, the next step is to align your equipment to the stars. Proper alignment is crucial for tracking Jupiter across the sky and keeping it in your camera’s field of view. A misalignment can result in blurry images or the planet drifting out of the frame during long exposures.
Alignment might seem daunting, but it’s just a matter of practice. Most telescopes come with finderscopes that help you align to a specific star. Use a bright star near Jupiter for this purpose. Aligning your telescope accurately will ensure that when you point it at Jupiter, the planet stays centered as you track it across the night sky.
Aligning with the North Star
Polar alignment is a method that involves lining up your telescope’s axis with the North Star, Polaris. This ensures that your telescope’s movement matches the Earth’s rotation, keeping celestial objects in your view longer. It’s especially helpful when taking multiple exposures of Jupiter to stack later. For more detailed information, see our guide on precise polar alignment.
Using Computerized GoTo Systems
For those who prefer a more hands-off approach, computerized GoTo systems can be a game-changer. After a simple setup and alignment process, these systems can automatically point your telescope at Jupiter, tracking it precisely throughout your photography session. Just input the planet’s coordinates or select it from the database, and you’re ready to go.
Camera Settings for Clarity
Camera settings can make or break your Jupiter shots. The goal is to capture as much detail as possible without overexposing the planet’s bright surface. You’ll need to experiment with different settings to find the sweet spot for your particular setup.
Start with a low ISO to reduce noise, and adjust the shutter speed to avoid overexposure. Remember, Jupiter is bright, and a high ISO can quickly lead to a washed-out image. Use the histogram on your camera to check the exposure level and aim for a well-balanced curve.
Another tip is to take advantage of your camera’s burst mode. This allows you to take a series of rapid shots, increasing your chances of capturing a clear image between moments of atmospheric turbulence.
Optimal ISO and Exposure Time
The optimal ISO for Jupiter photography is usually between 100 and 400, depending on your camera’s capabilities and the brightness of the planet. The exposure time should be short enough to freeze Jupiter’s rotation, generally between 1/30 and 1/250 of a second. These settings will help you capture the details on Jupiter’s surface without motion blur.
Understanding Planetary Frame Rates
When using a dedicated astrophotography camera, frame rate becomes an important factor. High frame rates allow you to take many images quickly, which is essential for stacking images in post-processing. Aim for a camera that can handle at least 30 frames per second to capture the fleeting moments of clarity through the Earth’s atmosphere.
Techniques to Triumph Over Challenges
Even with the best equipment and preparation, you’ll face challenges when photographing Jupiter. Atmospheric turbulence, light pollution, and equipment limitations can all affect your results. But don’t worry—there are techniques to help you overcome these obstacles and capture the beauty of Jupiter.
Mastering Manual Focus
Auto-focus systems often struggle with the low light and vast distances of astrophotography. Therefore, manual focus is your best friend. Take your time to adjust the focus until Jupiter’s image is as sharp as possible. Use the live-view mode on your camera and zoom in digitally to fine-tune the focus with precision.
Live-View Mode for Precision
Many modern cameras have a live-view mode that displays a real-time video feed on the LCD screen. Use this feature to your advantage by magnifying the image of Jupiter on the screen. This will help you achieve a precise focus, as you can make minute adjustments while observing the planet’s details closely.
Focus Aids and Techniques
If your telescope has a focusing aid, like a Bahtinov mask, use it to achieve perfect focus. This tool creates a diffraction pattern that helps you identify when the focus is spot-on. Alternatively, you can focus on one of Jupiter’s moons to ensure the planet itself is in sharp detail.
Avoiding Atmospheric Disturbances
Our planet’s atmosphere can distort the light coming from Jupiter, making your images appear blurry. This effect, known as ‘seeing,’ varies depending on weather conditions and location. To minimize its impact, photograph Jupiter when it’s at its highest point in the sky, where the atmosphere is thinnest.
Picking the Perfect Time
Keep an eye on the weather and aim for a night with stable air conditions—no wind, clear skies, and steady temperatures. These are the nights when the stars twinkle less, indicating steadier ‘seeing’ conditions for your Jupiter photography.
Using Dispersion Correctors
If you’re dealing with atmospheric dispersion, which causes a rainbow-like effect on Jupiter’s image, consider using an atmospheric dispersion corrector (ADC). This device aligns the different wavelengths of light, reducing the distortion and improving image clarity.
Remember, capturing Jupiter is a dance between your equipment and the cosmos. With patience and practice, you’ll learn to anticipate the planet’s movements, understand the whims of the atmosphere, and refine your technique to take breathtaking photographs of this gas giant.
Post-Processing Power: Polishing Your Jupiter Shots
Stacking Images for Detail
One of the most powerful techniques in astrophotography is image stacking. By combining multiple shots of Jupiter, you can significantly reduce noise and bring out subtle details that a single image might not reveal. It’s a bit like having a superpower that unveils the secrets of the gas giant.
Choosing the Right Software
Software like AutoStakkert! or RegiStax are the go-to choices for stacking planetary images. They align and stack your photos based on the best quality frames, sharpening the final image. These programs can seem complex at first, but with a little time, they become invaluable tools in your astrophotography arsenal.
Layers and Alignment for Sharpness
When stacking, the software will layer your images, aligning them based on surface features or the edges of the planet. This process compensates for any slight movements between shots, ensuring that the final image is as sharp as possible. It’s like piecing together a high-definition puzzle of Jupiter’s atmosphere.
Color Correction and Sharpening
After stacking, your image might still need some tweaks to look its best. This is where color correction and sharpening come into play, transforming your photos from good to great.
Balancing Colors for Authenticity
Color balance is crucial for an authentic representation of Jupiter. Adjust the white balance to remove any color cast and ensure that Jupiter’s colors are true to life. You can use software like Adobe Photoshop or Lightroom to fine-tune the colors.
Enhancing Contrast Without Overdoing It
Contrast enhancement can make Jupiter’s bands and Great Red Spot pop, but it’s easy to overdo it. Use the levels or curves tool in your editing software to gently boost contrast while preserving the planet’s delicate details.
Advanced Tips for Aspiring Planetary Photographers
Now that you’ve got the basics down, let’s push the envelope further. Advanced techniques can help you create even more captivating images of Jupiter. These tips are for those who are ready to take their planetary photography to the next level.
Tracking Jupiter’s Moons
Don’t forget about Jupiter’s moons—they can add context and beauty to your images. Tracking their movement and capturing their transit across the planet’s face is not only visually striking but also scientifically interesting. It’s like documenting the cosmic ballet that plays out every night.
Experimenting with High Dynamic Range (HDR) Imaging
HDR imaging can help you capture the wide range of brightness levels on Jupiter, from its bright equatorial zone to the darker belts. By combining exposures of different lengths, you can create an image with more detail across the brightness spectrum.
Timelapse Sequences of Jupiter’s Rotation
Creating a timelapse of Jupiter’s rotation showcases the planet’s dynamic nature. Set up your camera to take continuous shots over several hours, and then compile them into a video. Watching Jupiter spin, with its storms and winds swirling, is truly mesmerizing.
FAQs
What is the best time to photograph Jupiter?
The best time to photograph Jupiter is during opposition when it’s closest to Earth and fully illuminated by the sun. This typically happens once every 13 months. Also, aim for a night when Jupiter is high in the sky, and the atmosphere is stable for the clearest images.
Can I use my regular camera for Jupiter photography?
Yes, you can use a regular DSLR or mirrorless camera for Jupiter photography. However, you’ll need a telescope and an adapter to connect your camera. Shoot in manual mode with RAW format to capture the highest quality images.
Do I need a special filter to see the details on Jupiter?
While not strictly necessary, using color filters can enhance the visibility of Jupiter’s cloud bands and Great Red Spot. An atmospheric dispersion corrector (ADC) can also help to reduce the blurring effects of Earth’s atmosphere.
How can I handle the blurriness caused by the atmosphere?
Photograph Jupiter when it’s highest in the sky, use an ADC, and choose nights with stable, clear weather. Image stacking and post-processing sharpening techniques can also mitigate atmospheric blurriness.
Is it possible to photograph Jupiter from the city?
Yes, it’s possible to photograph Jupiter from the city, although light pollution may limit the quality of your images. Using a longer focal length to zoom in on Jupiter and a narrowband filter to cut through the light pollution can help you get clearer shots.


