Article-at-a-Glance
- Discover the different types of astrophotography: lunar, planetary, solar, deep space, star trails, and Milky Way.
- Learn what equipment is essential for capturing stunning celestial images.
- Understand the best techniques for photographing various astronomical subjects.
- Explore the importance of timing and planning in astrophotography.
- Get tips on post-processing to bring out the beauty of the night sky in your images.
Capturing the Cosmos: A Guide to Astrophotography Images
Staring up at the night sky, have you ever wondered how to capture its vast beauty? Astrophotography is the art of photographing the night sky and its celestial wonders. It’s not just about pointing a camera upwards; it’s a blend of science, art, and technical skill. Let’s embark on a journey to understand the various types of astrophotography images and how you can start creating your own stellar masterpieces.
Type-by-Type Breakdown
There are several types of astrophotography, each with its own charm and set of challenges. Whether you’re gazing at the Moon, marveling at the planets, or awestruck by the Milky Way, there’s something for everyone in the realm of astrophotography. Let’s break down these types and see what makes each one unique.
Key Equipment Essentials
Before diving into the different types of astrophotography, it’s crucial to know what gear you’ll need. At its most basic, you’ll want a camera capable of long exposures, a sturdy tripod to keep your shots steady, and a remote shutter release to avoid camera shake. But depending on what you’re photographing, you might need additional gear like a telescope, a star tracker, or various filters.
Steps to Stellar Imaging
- Choose your subject: Decide whether you want to capture the Moon, planets, stars, or deep space objects.
- Gather your equipment: Based on your chosen subject, assemble the necessary gear.
- Plan your shoot: Check weather conditions, moon phases, and light pollution maps.
- Set up your gear: Mount your camera on the tripod, attach any necessary accessories, and focus your lens.
- Test and adjust: Take a few test shots to check your framing and exposure settings.
- Capture the image: Use a remote shutter or timer to take your photos without disturbing the camera.
- Post-process: Use software to enhance your images and bring out the details.
With these steps in mind, let’s delve into the first type of astrophotography you might explore.
Lunar Landscapes: The Moon in Detail
The Moon is our closest celestial neighbor and a fantastic subject for beginner astrophotographers. Its bright surface and the rich detail of craters and mountains make it a captivating subject. Capturing the Moon requires minimal equipment and can yield incredibly detailed images.
Image Magnificence: Craters and Peaks
When photographing the Moon, aim to shoot during the first or last quarter phases. This is when the shadows cast by the Sun highlight the Moon’s topography, creating a dramatic effect. Using a telephoto lens or a small telescope can bring these features into view, allowing you to capture the magnificence of lunar craters and peaks.
For example, the crater Tycho, with its distinctive rays of ejected material, is a compelling feature that stands out brilliantly during the Moon’s quarter phases.
Phases and Features: Timing Your Shoots
The phase of the Moon greatly affects what features you can photograph. Besides the first and last quarters, the full Moon offers a chance to capture the entire face, though with less shadow detail. The new Moon, while invisible itself, provides the darkest skies for photographing other celestial objects.
Timing is everything. Shooting during a lunar eclipse can yield stunning images of a blood-red Moon, while capturing the Moon as it rises or sets can frame it beautifully against landscapes.
Now, let’s shift our gaze from our lunar companion to the other members of the solar system.
Planetary Portraits: Our Neighbors Up Close
After the Moon, the planets are some of the most thrilling subjects for astrophotographers. With the right setup, you can capture stunning details of our Solar System’s planets, like Jupiter’s bands or Saturn’s rings. For planetary photography, you’ll want a telescope with a high focal length to magnify these distant worlds, and a mount that can track their movement across the sky.
Aligning the Planets: Conjunctions and Oppositions
Planetary alignment and oppositions are prime times for shooting. When planets are in opposition, they’re closest to Earth, appearing larger and brighter. This is the ideal time to photograph Mars, Jupiter, and Saturn. Conjunctions, when planets appear close together in the sky, can make for striking compositions, especially when combined with landscape elements.
Color and Clarity: Achieving Vibrant Details
To capture the true colors and details of planets, use a technique called ‘lucky imaging.’ This involves taking many short exposure images and combining the clearest ones to produce a single, sharp image. With post-processing software, you can bring out the vibrant hues and fine details that make planetary images so mesmerizing.
Solar Snapshots: Shooting the Solar Spectacle
Photographing the Sun is an awe-inspiring pursuit, but it requires caution and the right equipment. Because the Sun is so bright, you need special solar filters to protect your eyes and camera. Once you’re equipped, you can capture phenomena like sunspots, solar flares, and the texture of the solar surface.
Solar Safety: Filters and Precautions
Before pointing your camera at the Sun, ensure you have a proper solar filter. This isn’t just for your camera’s sake, but for your eyes as well. Never look directly at the Sun through your camera or telescope without a certified solar filter. Safety is paramount when it comes to solar photography.
When choosing a filter, opt for one that fits snugly over your telescope or lens. Mylar or glass solar filters are common choices that reduce the Sun’s brightness and allow you to photograph it safely.
Capturing Activity: Sunspots and Solar Eruptions
Sunspots, which are cooler, darker regions on the Sun’s surface, and solar eruptions like flares and prominences, can be thrilling to photograph. They require timing and patience, as solar activity varies. Keep an eye on space weather forecasts to predict when these features might be most visible.
- Use a solar filter to protect your equipment and eyes.
- Choose a day with clear skies and low atmospheric turbulence.
- Monitor space weather for increased solar activity.
- Use a telescope with a high focal ratio for a detailed view.
- Take multiple exposures to increase your chances of capturing a transient event.
With these tips, you can safely capture the dynamic nature of our star.
Deep Space Dazzlers: Nebulae and Galaxies
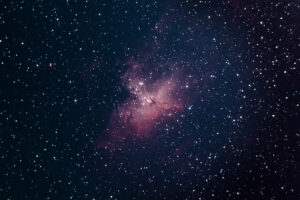
Deep space astrophotography is the pinnacle of celestial imaging, offering a glimpse into the vast and colorful expanses beyond our Solar System. Capturing nebulae and galaxies requires patience, dark skies, and often more sophisticated equipment like a telescope with a motorized mount to track the stars’ movement.
Long-Exposure Mastery: Tracking the Night Sky
For deep space objects, long exposures are key to collecting enough light to reveal their beauty. A motorized mount will help keep your camera fixed on these distant subjects as the Earth rotates. It’s a dance of precision, aligning your telescope with the celestial equator and tracking at the right speed to avoid star trails.
Embracing the Dark: Reducing Light Pollution for Clarity
Light pollution can wash out the faint details of deep space objects, so finding a dark location is crucial. Additionally, using a light pollution filter can help to block unwanted wavelengths from streetlights and other artificial sources, allowing the true colors of galaxies and nebulae to shine through.
Remember, deep space astrophotography is a game of subtlety and incremental improvements. Each session under the stars can teach you something new about capturing the cosmos.
Starry Timelapse: Celestial Motion in Frames
Timelapse astrophotography is a dynamic way to show the movement of the heavens. By taking a series of photos at intervals and combining them into a video, you can watch the stars wheel across the sky, the Milky Way glide overhead, or a meteor shower in fast-forward. For those interested in capturing such stunning celestial events, understanding the essential settings and techniques of an intervalometer can greatly enhance the timelapse experience.
Motion Techniques: Creating a Time-Lapse Sequence
To create a time-lapse, you’ll need to set your camera to take a photo at regular intervals, which can range from a few seconds to several minutes apart, depending on the effect you’re going for. A dark location is crucial, as you’ll be taking long exposures to capture the stars’ motion.
Tracking Tools: Using Intervalometers and Sliders
An intervalometer is an essential tool for time-lapse photography. It automates the shooting process, freeing you up to enjoy the night while your camera does the work. Adding a motorized slider can give your time-lapse a sense of motion, smoothly moving the camera during the shoot to create a more dynamic final product.
Combining these techniques can produce breathtaking results that not only showcase the beauty of the night sky but also its perpetual motion.
Milky Way Marvels: The Galactic Core
One of the most breathtaking sights in the night sky is our own Milky Way galaxy. To capture its sprawling dust lanes and sparkling star fields, you’ll want to plan your shoot around the core’s visibility, which varies depending on your location and the time of year. A wide-angle lens is typically the tool of choice here, allowing you to encompass the grandeur of the galaxy’s arc across the sky.
Galactic Positioning: Best Times and Locations to Shoot
The best times to photograph the Milky Way are during the summer months in the Northern Hemisphere and the winter months in the Southern Hemisphere. This is when the galactic core, the most detailed and dense part of the Milky Way, is visible. To maximize clarity, seek out locations with minimal light pollution, often far from city lights. Dark sky reserves and parks are ideal for this purpose.
Camera Settings for Capturing the Milky Way
- Use a wide-angle lens to capture as much of the sky as possible.
- Set your camera to a high ISO, usually between 3200 and 6400, to increase sensitivity to light.
- Open your aperture as wide as it will go, often f/2.8 or lower, to let in more light.
- Keep your shutter speed at around 20-30 seconds to avoid star trailing.
With these settings, you’ll be able to capture the Milky Way’s splendor in all its glory.
Editing for Excellence: Software and Techniques
Once you’ve captured your astrophotography images, the next step is to bring them to life through post-processing. Editing software like Adobe Lightroom and Photoshop, or specialized astrophotography programs like DeepSkyStacker, can help you enhance the details and colors of the night sky.
Stacking Stars: Using Software to Enhance Images
Image stacking is a powerful technique used in astrophotography to reduce noise and bring out faint details. By combining multiple exposures of the same scene, you can create a single, cleaner image. Software like DeepSkyStacker aligns and merges these images, resulting in improved clarity and color accuracy.
Post-Processing Tips: Bringing Out the Universe’s Colors
Adjusting the white balance, contrast, and saturation can make the colors of celestial objects pop. Don’t be afraid to experiment with these settings to highlight the natural beauty of the cosmos. Additionally, using noise reduction features can help smooth out the image without losing critical details.
Setting Up for Success: Your Astrophotography Checklist
Before you venture out into the night, it’s essential to be well-prepared. Here’s a checklist to ensure you have everything you need for a successful astrophotography session:
Gearing Up: The Right Tools for the Job
Make sure you have the following:
For those interested in whether you can do astrophotography with any telescope, it’s important to understand the equipment requirements for capturing stunning celestial images.
- A camera capable of manual mode and long exposures.
- A sturdy tripod to keep your camera stable.
- A wide-angle lens for capturing vast nightscapes or a telescope for close-up celestial shots.
- Extra batteries and memory cards, as long exposures can drain power and storage quickly.
- A red flashlight to preserve your night vision while operating your equipment.
Plan Your Shoot: Weather, Location, and Light Conditions
Check the weather forecast for clear skies, plan your location to avoid light pollution, and consider the lunar calendar. A new moon night is best for deep sky and Milky Way photography, while a first or last quarter moon is ideal for lunar imaging.
FAQ
What Equipment Do I Need to Start Astrophotography?
To start astrophotography, you’ll need:
- A digital camera with manual mode capability.
- A tripod for stability.
- A wide-angle lens for landscapes or a telescope for detailed celestial shots.
- Optional: A remote shutter release and a star tracker for long exposure photography.
How Do I Photograph the Moon with a DSLR?
To photograph the Moon with a DSLR, you’ll need to adjust your camera settings for the best results. For a comprehensive guide on getting started, check out this detailed astrophotography guide for beginners.
- Use a telephoto lens to get a closer view.
- Set your camera to manual mode and adjust the ISO, aperture, and shutter speed to avoid overexposure.
- Mount your camera on a tripod to prevent camera shake.
- Use a remote shutter release or the camera’s timer to take the shot.
Can I Capture Planetary Images with a Telephoto Lens?
Yes, you can capture planetary images with a telephoto lens, but a telescope will provide more magnification and detail. Use a high focal length lens, a steady tripod, and possibly a tracking mount to follow the planet’s movement across the sky.
What Safety Precautions Should I Take for Solar Astrophotography?
For solar astrophotography, always use a certified solar filter to protect your eyes and camera. Never look directly at the Sun through your camera or telescope without proper protection. Additionally, photograph during times of low atmospheric turbulence for clearer images.
What Are the Best Post-Processing Techniques for Deep Space Images?
Transforming raw deep space images into breathtaking vistas requires a specific post-processing workflow. Here are some key techniques to elevate your astrophotography:
Essential Steps:
- Image Stacking: This fundamental step combines multiple exposures (light frames) to increase the signal-to-noise ratio, resulting in a cleaner and more detailed final image. Software like Deep Sky Stacker (DSS) simplifies this process.
- Calibration: Eliminate unwanted artifacts like vignetting and hot pixels through calibration frames. Dark frames correct for sensor noise, flat frames address lens vignetting, and bias frames account for fixed pattern noise.
- Background Subtraction: Gradients, unwanted variations in brightness across the image, often plague deep space shots. Use tools like background subtraction to remove these and achieve a more uniform background.
Enhancing Details:
- Stretching the Histogram: Adjust the image’s contrast and reveal hidden details by stretching the histogram. This expands the range of brightness values, making faint features more visible.
- Color Calibration: Achieve accurate and pleasing colors by calibrating the white balance and adjusting saturation levels. This can be crucial for capturing the subtle hues of nebulae and galaxies.
- Noise Reduction: While stacking reduces noise, further refinement might be necessary. Techniques like selective noise reduction help eliminate noise while preserving image details.
Additional Techniques:
- Star Removal and Reduction: For Milky Way or other star-rich images, selective star removal can isolate the celestial object and allow for separate editing of the background and stars. Alternatively, star reduction tools can soften star halos without complete removal.
- Sharpening: Apply sharpening techniques cautiously to enhance details without introducing artificial artifacts.
- Local Adjustments: Utilize tools like dodge and burn to selectively brighten or darken specific areas, guiding the viewer’s eye towards the image’s focal point.
Remember, astrophotography processing is an art form. Experiment with different techniques, find a workflow that suits your style, and don’t be afraid to explore dedicated astrophotography software for a wider range of tools and functionalities.