Key Takeaways:
- The best focal length for astrophotography depends on the celestial target and sensor size.
- Wide-angle lenses (14mm-35mm) are ideal for capturing the Milky Way and large star fields.
- Mid-range focal lengths (50mm-85mm) are great for detailed images of constellations and comets.
- Longer focal lengths (100mm-300mm) are necessary for zooming in on distant galaxies and nebulae.
- Understanding the relationship between focal length, sensor size, and field of view is crucial for astrophotography success.
What is Focal Length in Astrophotography?
Let’s dive right in and tackle the basics. Focal length is essentially the zoom level of your lens or telescope. It’s the distance from the optical center of your lens to the sensor when you’re focused on a subject far away. In astrophotography, this little number, measured in millimeters (mm), determines how much of the night sky you can capture and how large celestial objects will appear in your images.
Think of it like a cosmic magnifying glass. A shorter focal length gives you a wider view, showing more of the sky but with less detail on individual objects. A longer focal length, on the other hand, zooms in closer, allowing you to capture finer details of distant stars, planets, and galaxies.
But why does this matter? Because choosing the right focal length can be the difference between a breathtaking image of the Orion Nebula and a blurry smudge that’s supposed to be Andromeda. It’s that important.
Factors Influencing Focal Length Choice
Several key factors should guide your decision when picking the perfect focal length for your night-sky adventures:
- Target size: Larger objects like the Milky Way need a wide-angle lens, while smaller ones like distant galaxies require more zoom.
- Sensor size: The larger your camera’s sensor, the wider the area you’ll capture. This means you can use a longer focal length and still get a broad view.
- Aperture: The lens’s aperture, or f-stop, affects how much light reaches the sensor. A wider aperture (a smaller f-number) lets in more light, which is ideal for astrophotography.
- Mount stability: The longer the focal length, the more any vibrations or movements are magnified, which can lead to blurry images without a stable mount.
Keep these factors in mind, and you’ll be on your way to capturing the cosmos like a pro.
Focal Length Fundamentals for Starry Sky Snaps
Now, let’s get into the nitty-gritty of focal lengths for different types of celestial shots. It’s not just about picking the longest lens you can find; it’s about matching your gear to your galactic goals.
The Role of Sensor Size
Your camera’s sensor size is like the canvas for your starry masterpieces. Full-frame sensors give you a wider view, which is great for expansive shots of the Milky Way. Crop sensors, however, have a “crop factor” that effectively increases the focal length of your lens. For example, a 50mm lens on a crop sensor camera with a 1.5x crop factor gives you the same view as a 75mm lens on a full-frame camera.
Why does this matter? Because you need to consider sensor size when choosing your focal length. A lens that’s perfect for a full-frame camera might not give you the field of view you want on a crop sensor.
Focal Length vs. Field of View
The field of view is the extent of the observable world at any given moment, and it’s directly tied to your focal length. Short focal lengths give you a wide field of view, perfect for capturing vast swaths of the night sky. Longer focal lengths narrow your field of view, bringing distant celestial bodies into sharp relief.
Remember, the key is balance. You want a focal length that gives you a field of view wide enough to showcase the splendor of the stars while still providing enough magnification to make those distant suns stand out.
Zooming In on Celestial Wonders: Optimal Focal Lengths
Let’s zoom in on some specific focal length ranges and what they’re best suited for in the realm of astrophotography.
Wide-Angle Wonder: 14mm-35mm for Milky Way Mastery
Wide-angle lenses are the go-to for capturing the grandeur of the Milky Way. Their expansive field of view allows you to take in the full arch of our galaxy, along with foreground elements that add depth and interest to your shots. Here’s what you can do with them:
- Shoot the entire Milky Way in one frame, especially during the summer months when it’s most visible.
- Capture large-scale meteor showers, creating images filled with streaking lights.
- Include interesting landscapes for a compelling composition that tells a story of scale and wonder.
With a wide-angle lens, you’re not just taking a photo; you’re painting a portrait of the universe.
Mid-range Majesty: 50mm-85mm for Constellations and Comets
When you want to step up your game and get a little closer to the cosmic action, mid-range focal lengths are your ticket. They strike a beautiful balance between capturing the context of the cosmos and focusing on specific celestial features. Here’s what you can expect:
- Detailed shots of constellations where individual stars are clear and distinct.
- Photographs of comets with their tails stretching across the sky, when they grace our skies.
- The ability to isolate smaller sections of the Milky Way for a different perspective.
Mid-range focal lengths allow you to be selective with your composition, giving you the power to tell a more focused story of the night sky. For more on capturing the cosmos, consider reading this guide on increasing your astrophotography field of view.
The Long Look: 100mm-300mm for Distant Galaxies and Nebulae
For those distant, ethereal objects like galaxies and nebulae, you’ll need a longer focal length. This is where things get really exciting. A lens or telescope with a focal length of 100mm to 300mm can transport you light-years away, right into the heart of these celestial wonders. Here’s what you can achieve:
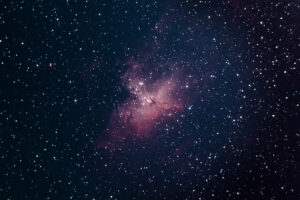
With a 100mm lens, you’ll start to see the structures of larger nebulae and the spiral arms of nearby galaxies. Pushing up to 300mm, you can capture the awe-inspiring details of these deep-sky objects, like the Pillars of Creation in the Eagle Nebula or the whirl of the Whirlpool Galaxy.
- Stunning close-ups of nebulae, revealing their intricate clouds and star-forming regions.
- Clear views of the arms and cores of spiral galaxies, each one a universe of its own.
- The ability to photograph smaller galaxies in a group, like the Leo Triplet.
With longer focal lengths, patience and practice are key, but the results can be otherworldly.
Matching Focal Length with Celestial Subjects
Choosing the right focal length isn’t just about the numbers; it’s about understanding what you want to capture. Let’s align our lenses with the stars and find the best focal lengths for some popular celestial subjects.
Bright Nebulae and Star Clusters
For the glowing gas clouds of bright nebulae and the sparkling points of star clusters, you’ll want a focal length that can capture both their scale and their beauty. A range of 50mm to 200mm is typically a good bet, depending on the size of the object and your sensor. This range lets you frame the Orion Nebula or the Pleiades in all their glory, with enough detail to make out individual features or stars.
Galactic Cores and Spiral Arms
Galactic photography is all about the details. To photograph the core of our Milky Way or the spiral arms of Andromeda, you’ll need a focal length that brings these distant structures into view. A lens in the 200mm to 400mm range is a great start, allowing you to focus in on these grand designs without losing the context of their surroundings.
Remember, shooting galaxies is not just about the equipment; it’s also about finding dark skies and using the right settings to capture those faint details.
Moon Craters and Solar Phenomena
Our own moon is a treasure trove of craters, mountains, and ancient lava plains waiting to be explored with your camera. For lunar photography, a focal length of 300mm or more will let you zoom in on the moon’s surface. And when it comes to solar phenomena like sunspots or eclipses, always remember to use a proper solar filter for safety. A focal length of 400mm to 600mm, paired with a filter, can provide stunning views of our star’s fiery features.
Lenses and Telescopes: A Harmonious Pairing
Photography lenses and telescopes are both vital tools in the astrophotographer’s kit. Each has its strengths, and knowing when to use one over the other can make all the difference in your astrophotography journey.
Lenses are generally more versatile and portable, ideal for wide-field shots and quick setups. They’re perfect for those nights when you want to capture the beauty of the stars without lugging around heavy equipment.
Telescopes, on the other hand, offer greater magnification and are essential for detailed images of distant celestial bodies. They’re your go-to when you’re ready to dive deep into the cosmos and capture those awe-inspiring shots that require more zoom and stability.
Here’s a quick guide on choosing the right tool for the job:
- Lenses: Ideal for wide-field astrophotography, landscape astrophotos, and capturing large celestial events.
- Telescopes: Best for high-magnification images of planets, galaxies, and nebulae, as well as detailed lunar photography.
Choosing the Right Lens for Your Camera and Subjects
Picking the right lens is like choosing the right paintbrush; it all depends on what you’re trying to create. Here’s a simple approach:
Start with the subject. What are you aiming to photograph? If it’s the vastness of the Milky Way, a wide-angle lens is your friend. For the moon’s craters, you’ll want a telephoto lens with a long focal length.
Next, consider your camera. What’s the sensor size? Remember, this will affect the effective focal length of your lens. A 24mm lens on a crop sensor camera won’t give you the same field of view as on a full-frame sensor.
Finally, think about portability and ease of use. If you’re hiking to a remote location, a lighter, more compact lens might be the way to go, even if it means sacrificing some zoom.
When to Shift from Lenses to Telescopes
Moving from lenses to telescopes is a big step in any astrophotographer’s journey. Here are a few signs that it might be time to make the leap:
- You’re craving more magnification than your longest lens can provide.
- You want to capture highly detailed images of planets or deep-sky objects.
- You’re ready to invest in more specialized equipment for your astrophotography hobby.
Switching to a telescope opens up a new universe of possibilities, but it also comes with a learning curve. Embrace the challenge, and you’ll be rewarded with images that truly capture the wonder of the night sky.
Practical Advice for Sharp, Stellar Photos
So, you’ve got your focal length figured out and you’re ready to shoot. But before you set up your tripod and start snapping away, there are a few more things to keep in mind to ensure your photos are as sharp as the stars themselves.
Stability is key in astrophotography. Any shake or vibration can turn a potentially stunning photo into a blurry disappointment. Use a sturdy tripod, engage your camera’s mirror lock-up feature if it has one, and consider using a remote shutter release or the camera’s timer to minimize camera shake when taking the shot.
Stabilization Techniques for Long Focal Lengths
When you’re zoomed in on the heavens, even the slightest movement can result in a blurry image. To combat this, use a heavy-duty tripod and a mount that’s designed to handle the weight of your camera and lens or telescope. If it’s a windy night, hang a weight from the center of your tripod to keep it grounded. And always, always use a remote or timed shutter release to avoid nudging the camera when you take the shot.
Another tip is to use a mount with a motor drive or a tracking system, especially when working with longer exposures. These devices move your camera at the same speed as the stars’ apparent motion across the sky, keeping your target in sharp focus throughout the exposure.
Exposure Times and Aperture: Balancing Light and Sharpness
Long exposure times can capture more light, which is great for dim stars and distant galaxies. But too long, and you risk star trails due to Earth’s rotation. A rule of thumb is the “500 Rule,” which suggests you divide 500 by your focal length to find the longest exposure before stars begin to trail. For example, with a 50mm lens, you shouldn’t expose for more than 10 seconds (500/50=10).
As for aperture, a wider aperture (a lower f-number) lets in more light, which is ideal for astrophotography. However, be mindful of your depth of field, especially when including foreground elements in your composition. Sometimes, stopping down a bit can sharpen up the overall image.
Common Focal Length FAQs in Astrophotography
Now, let’s address some frequently asked questions that might be twinkling in your mind.
How Does Focal Length Affect Astrophotography?
Focal length determines the magnification of your subject and the width of the scene captured. Shorter focal lengths provide a wide field of view, suitable for large celestial structures like the Milky Way. Longer focal lengths allow for detailed images of planets, stars, and distant galaxies. The focal length you choose will shape the story you tell with your astrophotography.
What Focal Length Should Beginners Use for Stars?
Beginners should start with a wide-angle lens, somewhere in the 14mm-35mm range. This allows for easier capturing of night sky scenes and requires less precision in tracking the stars’ movement. It’s a forgiving and rewarding way to start your astrophotography journey.
Can You Use a Regular Lens for Astrophotography?
Absolutely! Regular camera lenses can be great for astrophotography, especially if they have a wide aperture (f/2.8 or lower is ideal). Many stunning astrophotos have been taken with standard lenses. The key is to understand how to use the lens effectively for the celestial scenes you want to capture.
Is a Higher or Lower Focal Length Better for the Moon?
For detailed photos of the moon’s surface, a higher focal length is better. A focal length of at least 300mm is recommended for capturing the craters and textures of the lunar landscape. The longer the focal length, the more you can zoom in on specific features of the moon.
How to Calculate the Best Focal Length for Your Specific Target?
To calculate the best focal length for your target, consider the size of the object and the field of view you want. Use the “500 Rule” for exposure to avoid star trails and factor in your camera’s sensor size for the effective focal length. Experimentation is key; take test shots and adjust your focal length to find the sweet spot for your subject.